
1. INTRODUCTION
1.1. About this manual
1.1.1. Copyright Notice
All rights reserved. No part of this document may be reproduced, copied or transmitted in any form by any means electronic, mechanical or otherwise without the permission of Marquise Technologies sàrl. If you are interested in receiving permissions for reproduction or excerpts, please contact us at contact@marquise-tech.com.
1.1.2. Trademarks
Marquise Technologies, the company’s logo and products' logo are pending registration trademarks of Marquise Technologies sàrl. All other trademarks mentioned here within are the property of their respective owners.
1.1.3. Notice of Liability
The information in this document is distributed and provided “as is“ without warranty. While care has been taken during the writing of this document to make the information as accurate as possible, neither the author or Marquise Technologies sàrl shall not be held responsible for losses or damages to any person or entity as a result of using instructions as given in this document.
1.1.4. Conventions
This documentation makes use of several symbols and typographical conventions in order to differentiate various paragraphs from standard descriptive text. Here is the list of symbols and typographical styles used:
|
INFO : Additional information about the current topic. |
|
WARNING : Important information that you should always take into consideration. |
|
TOOL-TIP : Additional information about tool usage |
1.2. About ICE Prime
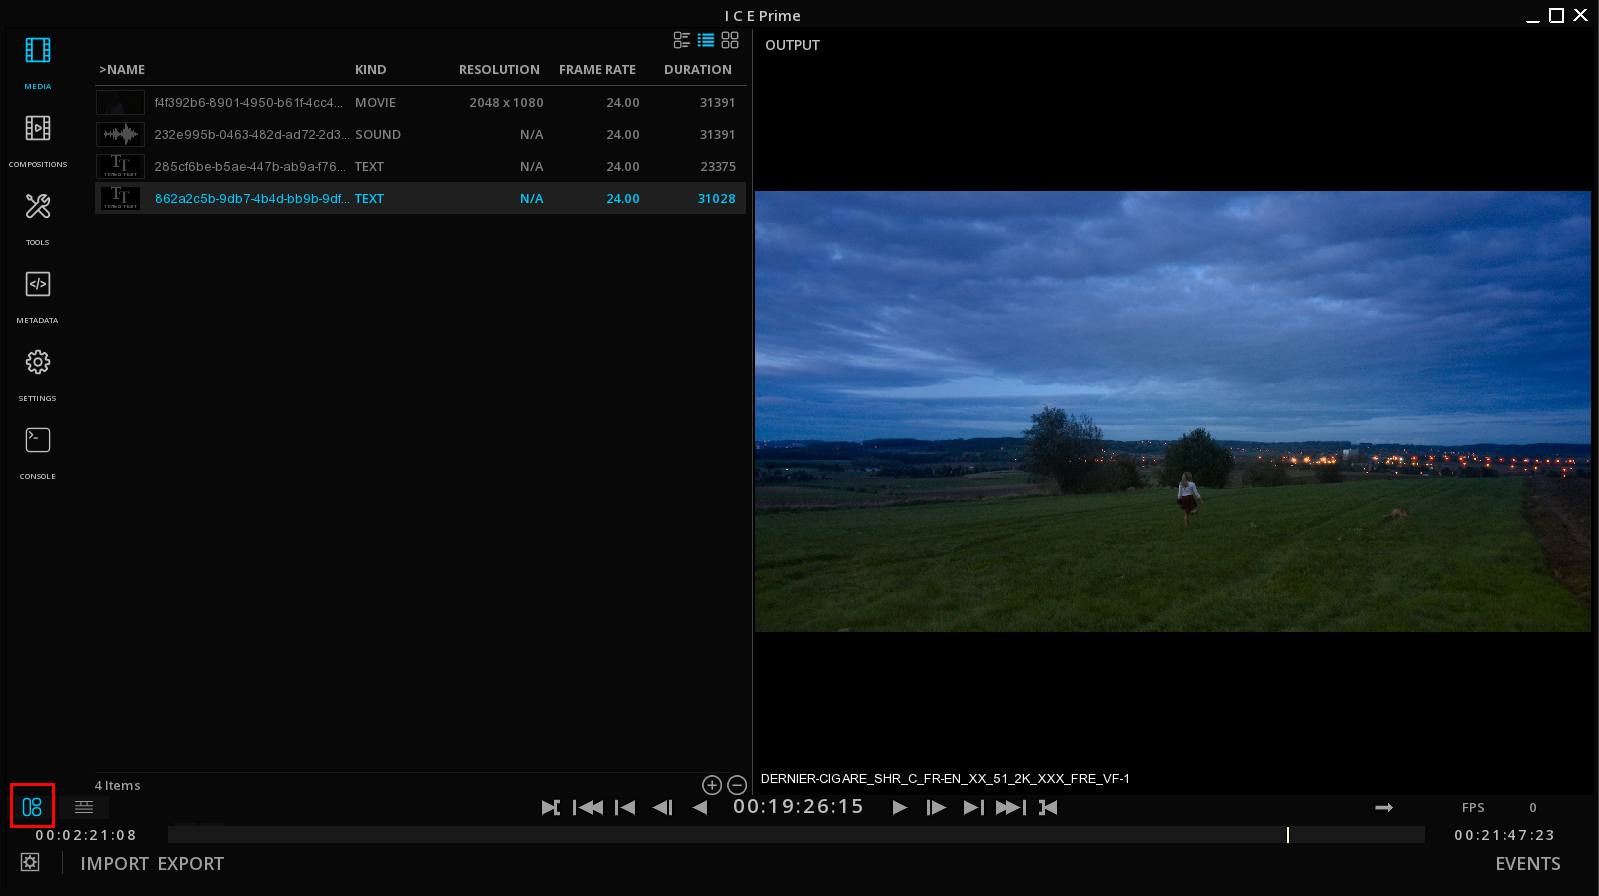
ICE Prime is a Reference player for the QC and real-time playback of broadcast, digital cinema and OTT industry standards on regular desktop systems.
As a reference player, ICE Prime offers unrivalled tools to monitor 4K HDR and NGA media on any kind of device (computer screen, reference monitor or DCI projector). A timeline with display of video, audio, subtitle tracks, markers and reels gives full overview of the content, including complex media packages.
CIE Chromaticity diagram, histogram, waveform, and vectorscope are also part of the toolbox for image analysis in a variety of color spaces, including ACES and REC 2020. On the audio side, a full set of meters allows Loudness measurement (EBU R128), Phase and peak controls.
Subtitles & Captions checking is made easy with the display of text lines and spotting list metadata. The support of timed text also includes embedded subtitles and captions.
ICE Prime supports a large variety of automatic file-based QC reports, making it the perfect assistant player to monitor the list of errors.
1.3. Documents & Resources
The release notes, the latest available version of the software and the Knowledge Base is available on Marquise Technologies support portal.
1.4. Contacting Support
Support is available for customers under a valid support and maintenance program.
All the Support requests need to be sent using our ticketing system, accessible from the Support Portal.
To inform us of an issue or place a question related to product support, please go under TICKETS to create a new ticket.
Please report only one question or issue per ticket and indicated the version of the software you are using.
The more information you give us, the best we can help.
Please note that for urgent tickets we process them in order of arrival.
2. INSTALLATION
This chapter covers the installation of ICE Prime, and in particular:
-
Hardware Requirements
-
Software installation
-
License installation
-
Opening and exiting the application
2.1. Hardware Requirements
The way ICE Prime playbacks media highly depends on the capabilities of the hardware chosen. Please make sure to select the computer according to your needs.
2.1.1. Minimal Requirements
| Operating System | Microsoft Windows 10 64 bit |
|---|---|
CPU |
2.6 Ghz Core 2 Duo or faster |
RAM |
16 GB RAM or more |
Graphics |
Any graphics adapter that supports OpenGL |
Display |
1280 x 768 or larger |
2.1.2. Optimal Requirements
| Resolution | Hardware Requirements |
|---|---|
HD |
32 thread dual XEON CPU’s |
2K/4K |
32 thread dual XEON CPU’s |
Supported Video IO cards |
Bluefish44 Kronos, Bluefish444 Supernova S+, Bluefish444 Neutron, |
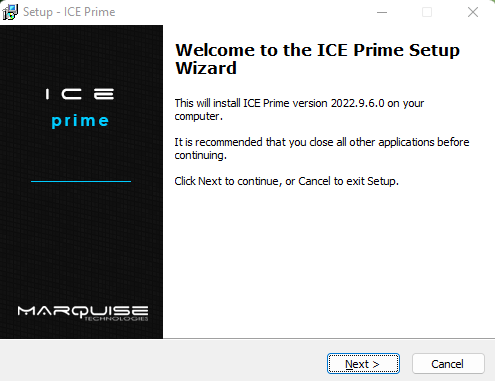
2.2. Software Installation
ICE Prime latest release version can be downloaded from the Support Portal.
Follow the instructions of the Set up wizard for the installation on your computer :
2.3. Starting ICE Prime
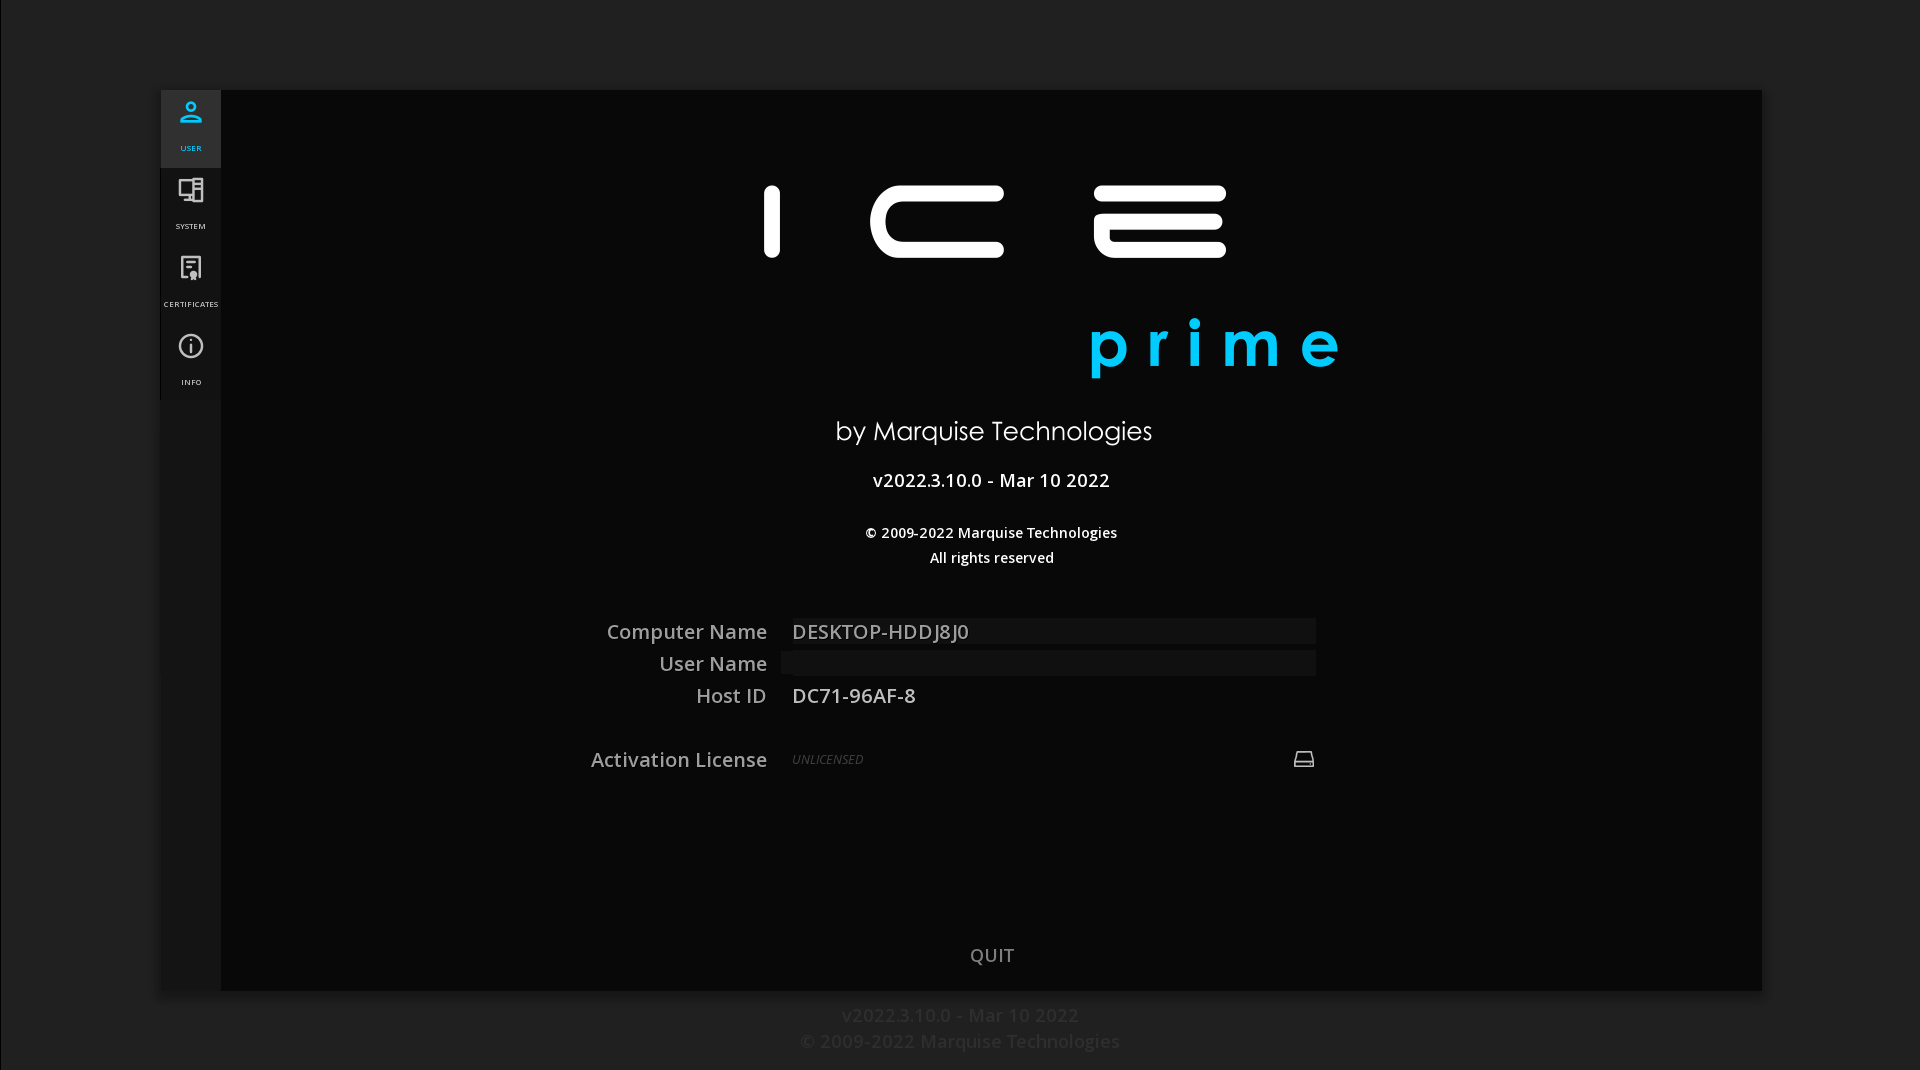
If it is the first time you launch ICE, it opens on the Home / User page:
For all further openings, ICE Prime opens by default on the main window of the application.
2.4. License installation
Launch the software to install the license.
From support@marquise-tech.com , you should have received a license file: license.dat.
Sometimes, for a special purpose, this file has a different name, this makes no difference.
→ To import the license, click on the Browse icon:
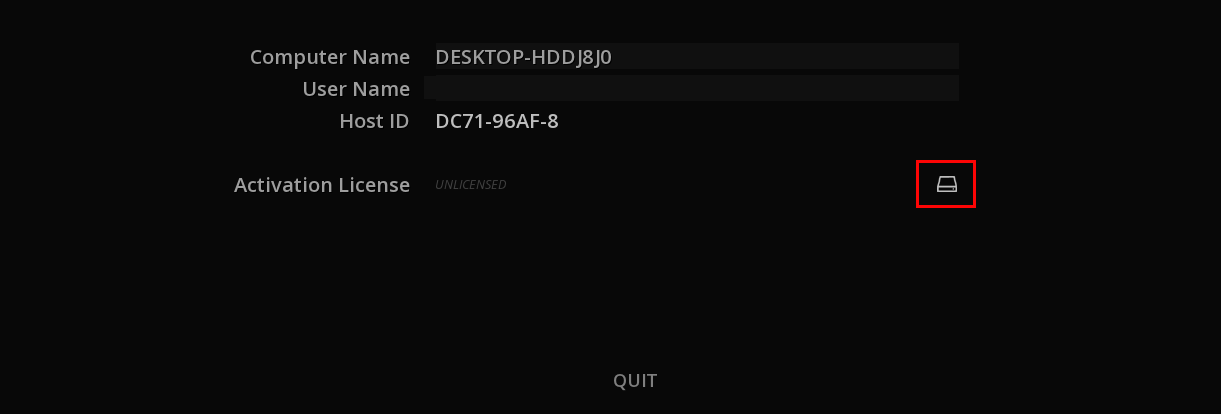
→ Browse the file system to the location where you have stored the license.
By default ICE Prime browser filters the files to only display ".dat" files in order to ease the search:

→ Validate with OK
Once the License has been successfully installed, the License Status displays the type of license:

3. SYSTEM SETTINGS
This panel allows the settings of different parameters for the system.
3.1. User
In the User page you will find important information like
-
the current version of ICE Prime
-
the type of ICE Prime License installed
-
Computer and user name information

3.2. System
In this page you can configure your system parameters.
3.2.1. User Interface
Select your preferences for the user interface:
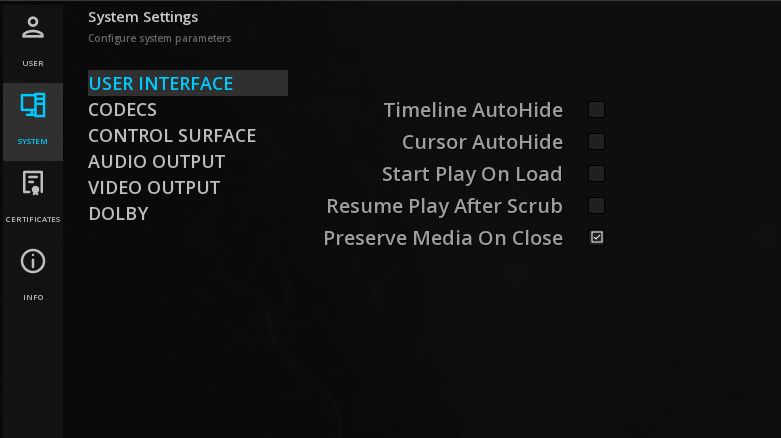
| Timeline Auto-Hide |
automatically hides the Timeline during playback |
| Cursor Auto-Hide |
automatically hides the mouse cursor during playback |
| Start play on Load |
starts automatically the playback of the content loaded on the timeline. |
| Resume Play after Scrub |
resumes the playback after a scrub of the playhead with the mouse. |
| Preserve Media on close |
The media present in the media bin as well as the compositions are saved and will be retrieved at next ICE Prime opening. |
3.2.2. Codecs
This tab allows you to set define the decoding device to use for certain codecs.
You can also defines the maximum number of CPU threads engaged in the decoding process.
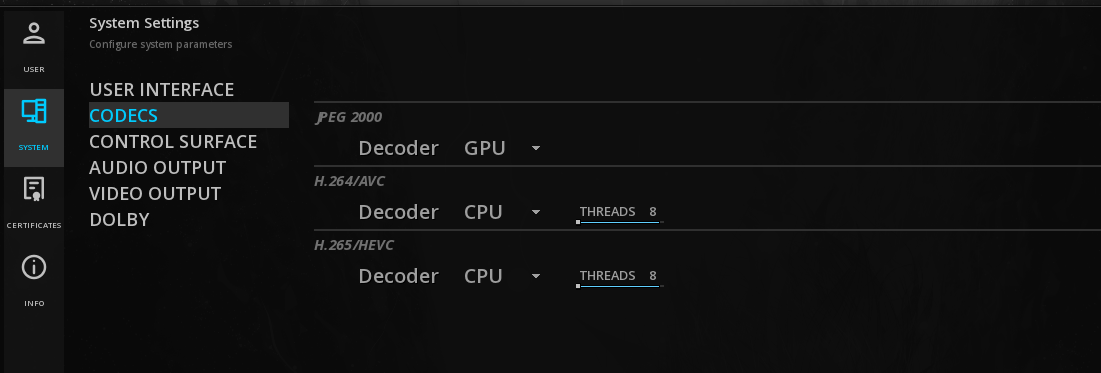
|
CPU encoding: the number of threads varies with the available shared memory. |
3.2.3. Control Surface
When using a control panel, this is where you can connect and configure it.
The Tangent Devices panels are supported.
→ Select Tangent Tube from the drop-down menu.
|
Please be sure to have install the control panel’s drivers before. |
3.2.4. Audio Output
When your system has several audio devices connected, use the Audio Output Device drop down menu to select the desired one.
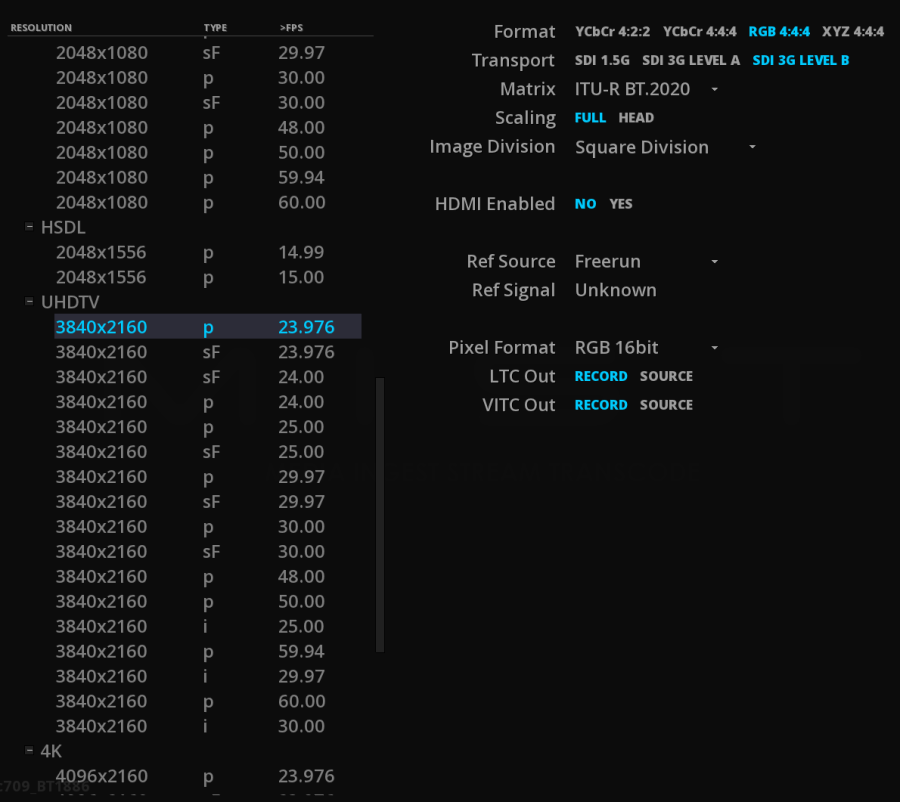
3.2.5. Video Output
In this page, you can define the video output signal. Select it from the drop down menu.
| None |
the ouptut signal will be available from the NVIDIA GPU |
| IO board |
the output signal will be sent to the video IO board installed |
| Newtek NDI |
the output signal will be sent to a NDI connected device. |
Video IO boards
If a video IO board is properly installed, its name will be displayed in clear in the drop down list and you can start setup the video output of your project.
|
Resolutions displayed in the list are relative to the formats supported and delivered by the I/O card. Basics drivers are installed with the application. The |
|
The Video output settings of the Project only defines the output through the video IO card. |
HDMI
When available from the video IO board, selecting this option output the signal using HDMI as well.
Both SDI and HDMI output can be done in parallel.
Dolby Vision
Enable this option to send the Dolby Vision metadata over HDMI to the consummer TV (tunneling). See Dolby Vision for more information.
|
The Dolby Vision Tunneling capabilities is only available using a AJA Kona 5 video IO board. |
Audio Delay
The audio delay is used to read the audio ahead of the video in order to compensate the delay introduced by an external audio processing device (e.g. a Dolby E decoder).
The value represents the number of frames ahead of the video position from which audio is read during playback.
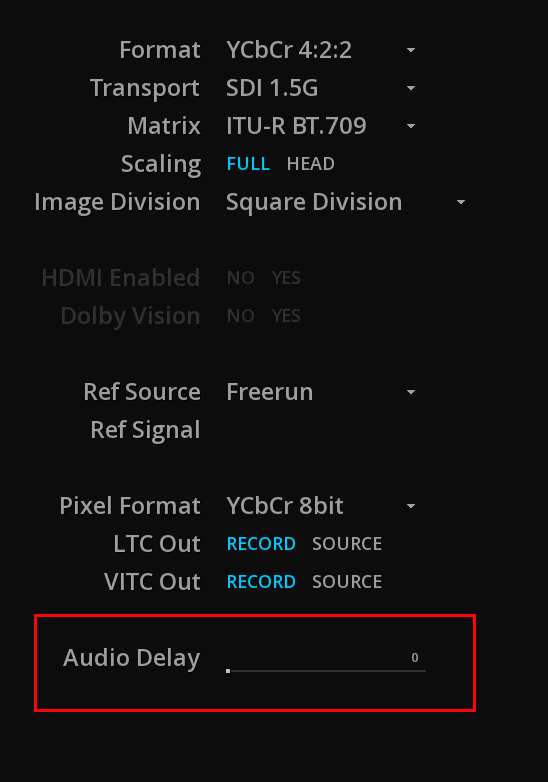
→ Use the slider or double-clik on the value to set the desired audio delay in frames.
4. GETTING STARTED
This section covers high level information about ICE Prime, and in particular:
-
ICE Prime User Interface Structure
-
Interface Basics
4.1. Overview of the Viewport
ICE Prime is built around the Viewport.
The Viewport workspace also displays:
-
The Command Panel
-
The Menu Bar
-
The transport bar & Timeline

4.1.1. The Menu bar
The menu bar display different icons:
|
SETTINGS |
Access to the System Settings |
IMPORT |
Import media, metadata files (QC report), as well as content packages (DCP, IMF) and KDMs. |
|
EXPORT |
Export comments |
|
EVENTS |
Show / hide the Events Viewer |
4.1.2. The Command Panel
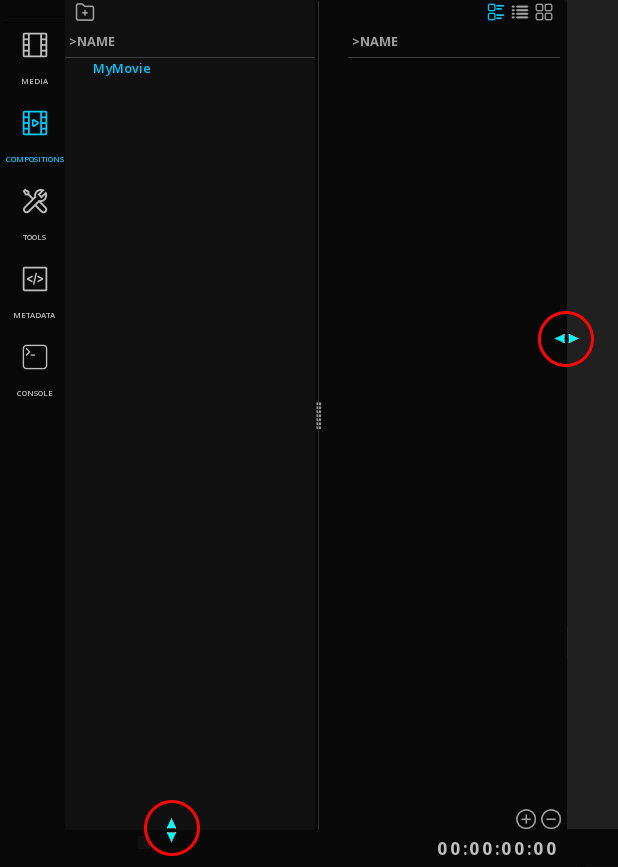
The Command Panel gives access to the assets of a particular content (media, compositions, metadata) as well as some tools for working with those assets.
Accessing the Command Panel
By default on opening the Command Panel is displayed.
You can hide it using the icon ![]() COMMAND below the panel itself:
COMMAND below the panel itself:
Command Panel Menu
On the left of the panel a vertical menu bar give access to the different features and tools :
|
MEDIA |
manage MEDIA of the project |
|
COMPOSITIONS |
display the different compositions of the project |
|
TOOLS |
access AUDIO ROUTING, REELS, MARKERS, SUBTITLES and LOCATORS controls, QC REPORTS, ZEBRA Modes |
|
METADATA |
display assets and compositions' metadata |
|
COMPOSITION SETTINGS |
manage the COMPOSITION SETTINGS: Output format, color management, overlays |
|
CONSOLE |
provides information related to Storage, GPU and video IO card performances. See section CONSOLE |
4.2. Timeline
By default, ICE Prime displays only the Scrub bar.

For a more detailed view, you can display ICE Prime’s timeline:

This is a non editable timeline representing the different tracks.
Read more about ICE Timeline.
4.3. Interface Basics
Whatever the module or sub-module you are in, the following interface displays can be met.
4.3.1. Cursors
ICE Prime mouse cursor changes appearance if an action with the mouse is possible:
|
Cursor in normal mode |
|
Possibility to move horizontally an interface element |
|
Possibility to move vertically an interface element |
|
Possibility to extend or resize and interface element |
|
Cursor in move mode |
|
Indicates that the application is busy performing an operation |


5. IMPORTING MEDIA
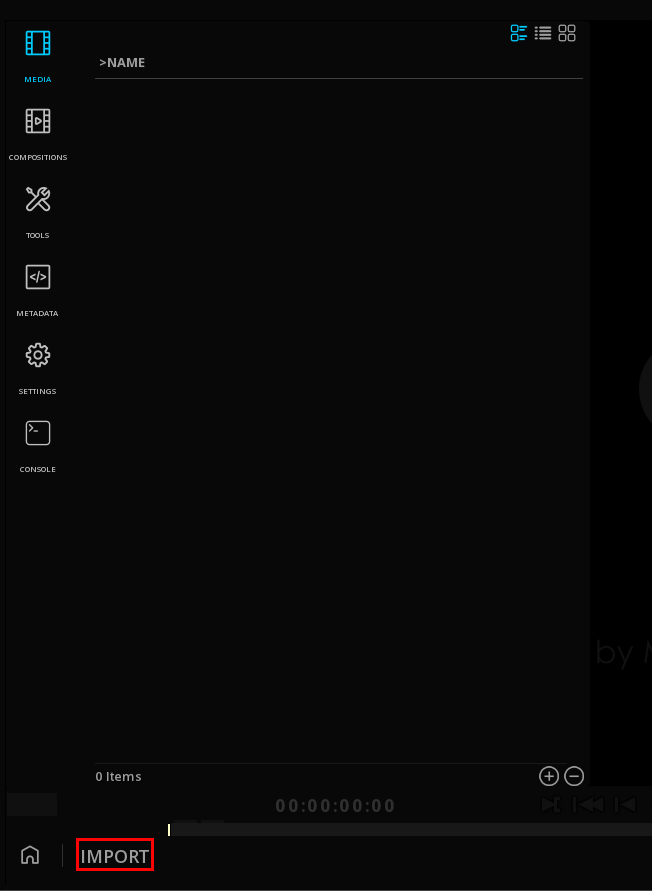
ICE Prime allows to import a large variety of media. They are managed in the Media tab of the Command Panel.
5.1. Media Tab
The Media tab is where the essences for a specific project are manually or automatically referenced from disks or a SAN.
The essences can be any type of video, audio, or subtitles files. From there assets can be selected for the playback.
5.2. Import of Media
There is two ways for importing files in the bin:
-
Drag & Drop from Windows file system
-
Import function using the internal smart file browser
5.2.1. Drag & Drop files from Windows' file system
Drag & Drop from Windows' file system allows you to easily import flat files, packages (DCP, IMF, iTunes, etc..), image sequences, compositions, sidecars files, etc.
→ Hit the Windows key or press + at the bottom right of the panel to display the Windows file browser.

→ Select your files and drop them anywhere in the application’s window.
Once the media are properly referenced, they are displayed in the Media tab.
Drag & Drop sequences
To import image sequences like DPX or TIFF drag & drop the first image of the sequence and the full sequence will be automatically imported.
|
Because there is not always information about frame rates in DPX or TIFF files, see the procedure detailed in the chapter Playback for the playback of image sequences at a manual frame rate. |
5.2.2. Import Panel
The Import panel is an internal smart file browser that has the capability of understanding complex media files and packages.
→ Click on the IMPORT button at the bottom of the application window to display the Import panel.
The Import panel is composed of 2 areas:
The left column, used for quickly navigating through the physical files volumes the system is connected to.
Bookmarks and Aliases are also displayed there.
The folder tree column, showing folders' organization within a volume.
In order to ease the navigation, you can display only a specific file type.
→ Click on the file type to open the drop-down menu:
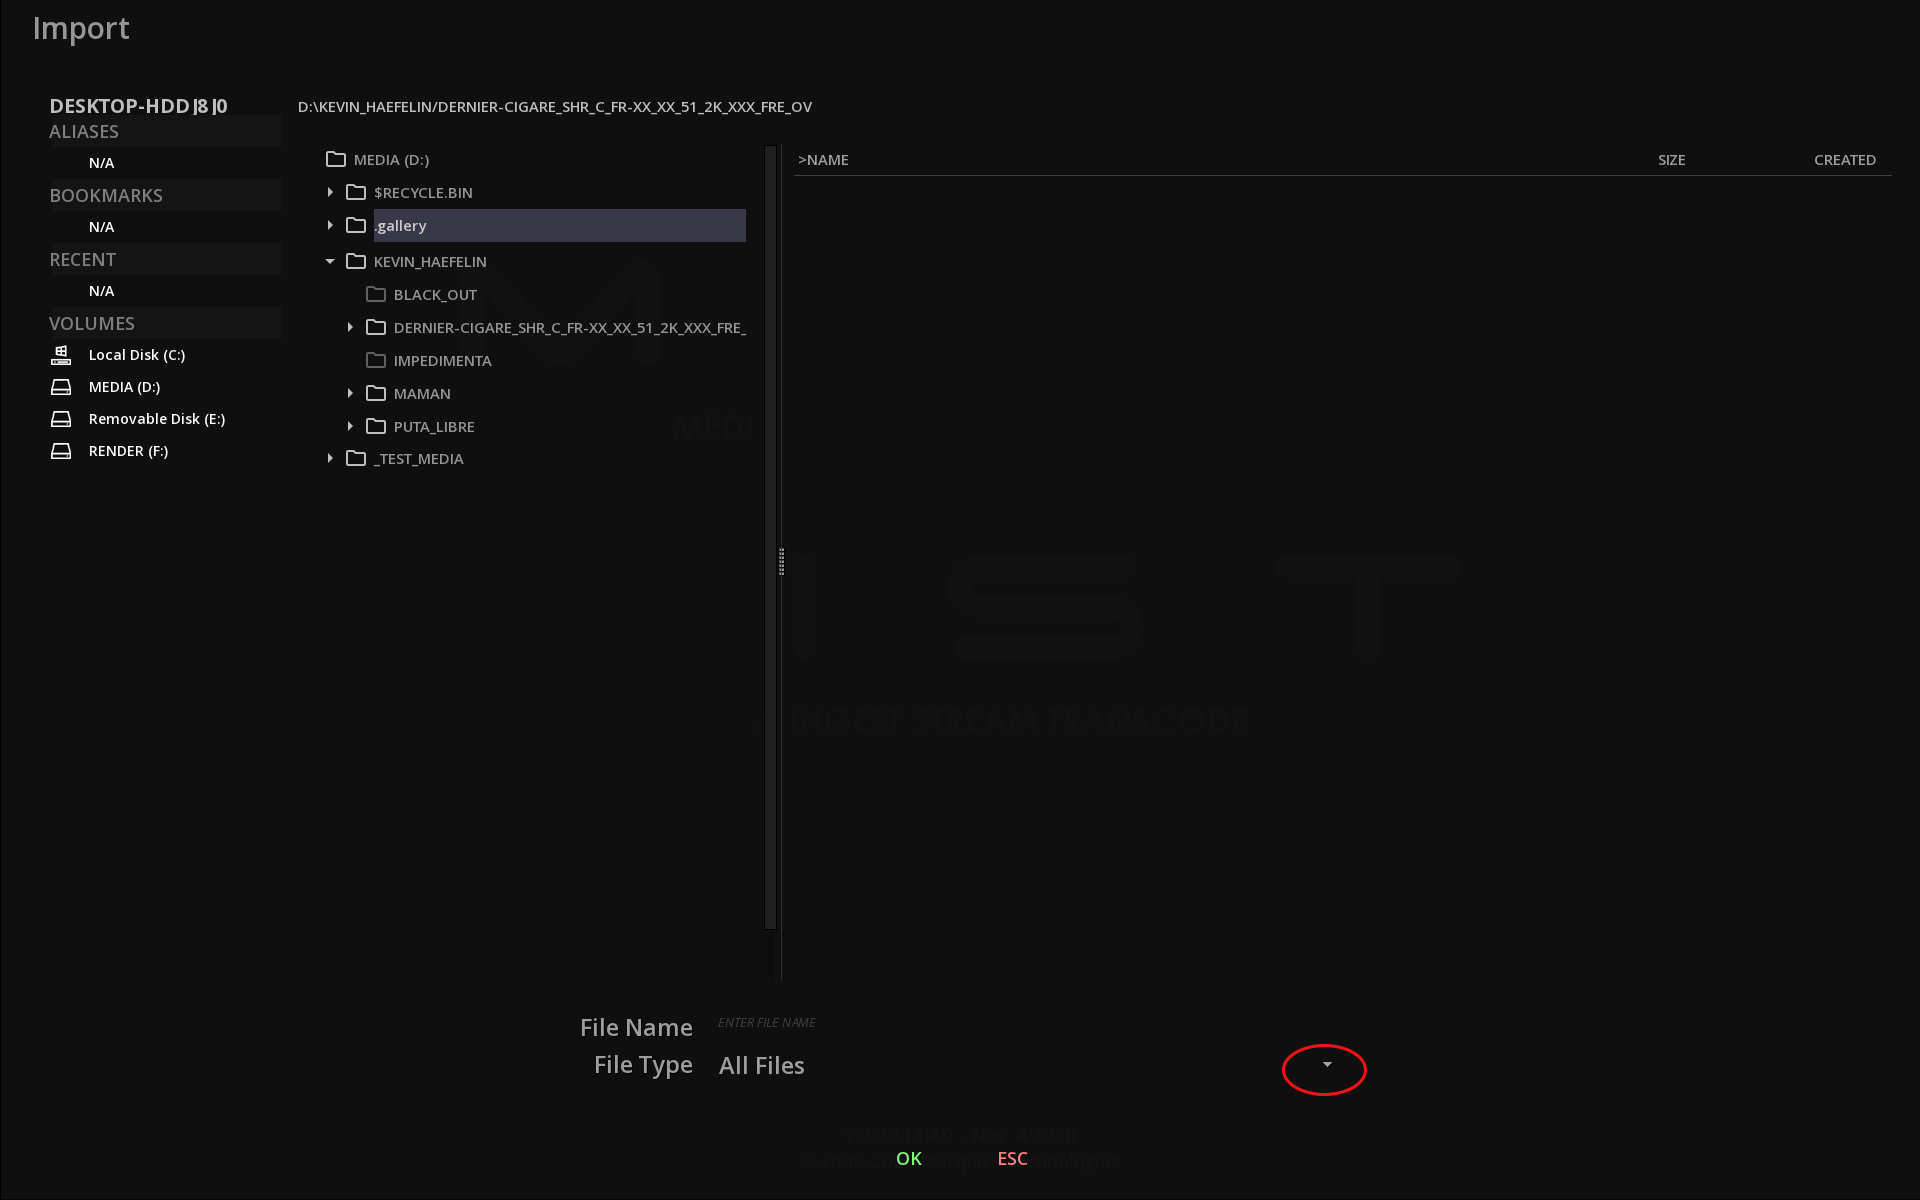
→ Select the desired type of file from the list:
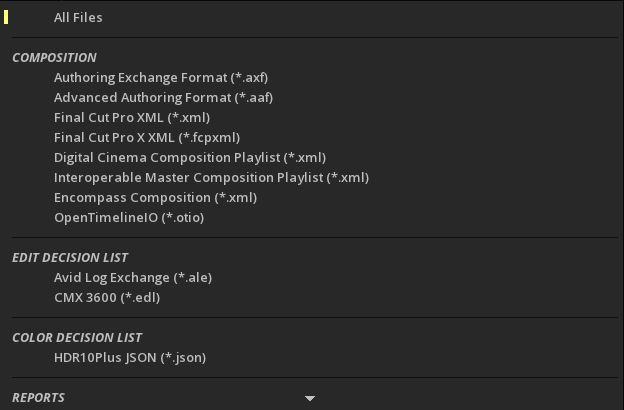
→ Validate the import using OK.
5.2.3. Delete Media
→ To delete a media, select the desired clip and press *- at the bottom right of the Command Panel.
→ Alternatively, when the clip is selected, you can →. Choose Delete from the drop-down menu.
|
Deleting a media in the Media tab will remove it from the media bin and will not physically delete the file. |
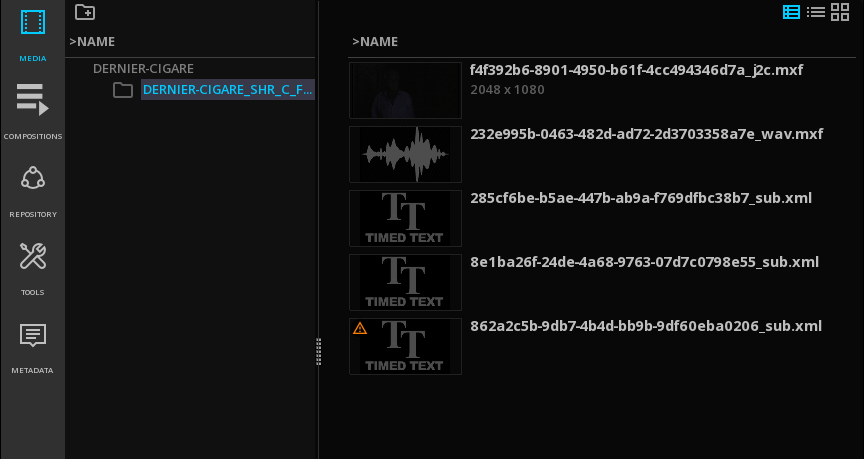
5.2.4. Media views
The operator can display the media assets using different views :
-
Thumbnails
-
List details
-
List tiles
Click on the View icons on the upper right of the Command Panel to change the views:
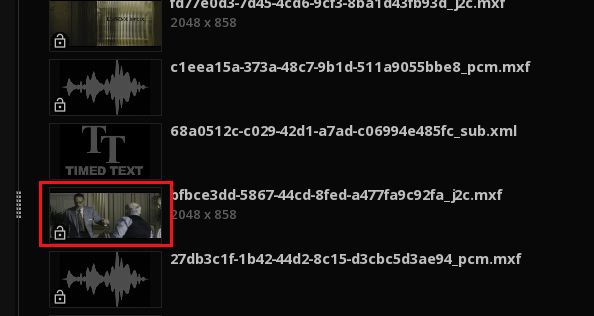
5.2.5. Encrypted content
When importing an encrypted DCP, the assets are displayed with a closed lock and the media preview is black:
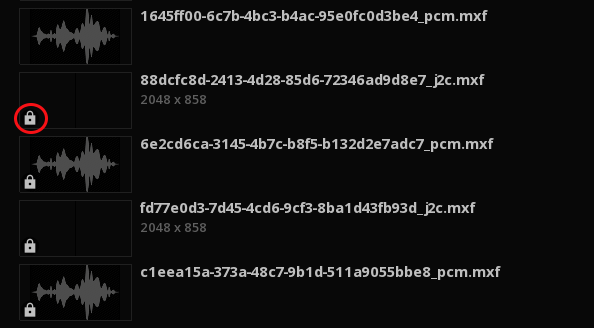
After importing the KDM (See Import Encrypted DCP), the locks are open and the media preview is enabled.
5.3. Media tab Options
5.3.1. Direct PlayBack
→ A double click on a media will automatically load the content on the timeline.
→ To start automatically the playback of the content loaded on the timeline, enables the option Start play on Load in the System Settings, User interface.
→ to start the playback of an IMF or DCP package, see the Composition tab information on next chapter.
5.3.2. Media tab Menu
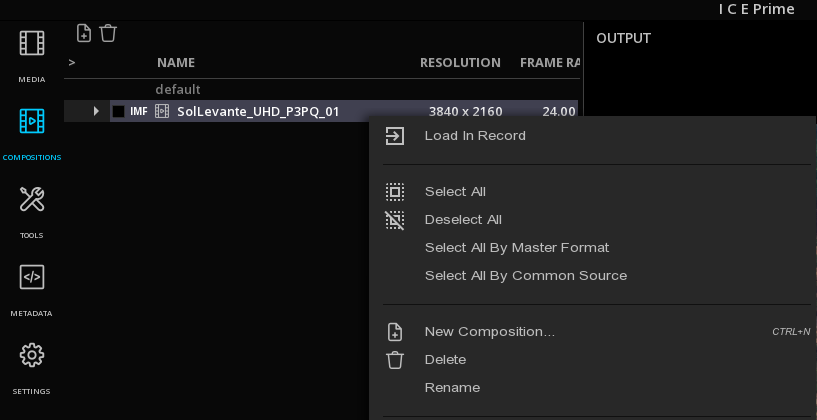
When performing a right-click on a clip in the Media bin you access the Clip menu offering several options:
| Load in Record |
Load the clip on the timeline in a new Composition |
| Delete |
Delete the clip from the project media bin |
| Relink |
To relink a media |
| Rename |
Rename the file as it appears in the media bin. Does not affect the name of the original file. |
| Open System Location |
Opens the Windows’s file browser to the physical location of the media |
| Select All |
Select all the clips in the current directory |
| Deselect All |
Deselect all the clips in the current directory |
| Add Media Track |
Add the media as an additional track on the current composition |
| Save Media Info report |
Create a media info report in PDF and XML as well as in EBUCore XML. |
5.3.3. Adding separate audio or subtitles files
In order to playback stand alone files together with a video, for example external subtitles or audio files, it is possible to add them on the current timeline:
→ Right-click on the file and select Add Media Track: a new track with has been created.
|
The new clip is placed at the position of the playhead. |
5.3.4. Relink Media
When a media referenced in a project has been moved from its original physical location, the application cannot access it and it is no longer possible to work with it.
In this case, a warning is displayed on the clip:
It is then necessary to proceed to a manual relink of the path to the files.
-
right-click on the clip in the Media tab to display the drop-down menu.
-
Browse the file system to the new location of the file
-
Click OK to validate
Your media is now relinked.
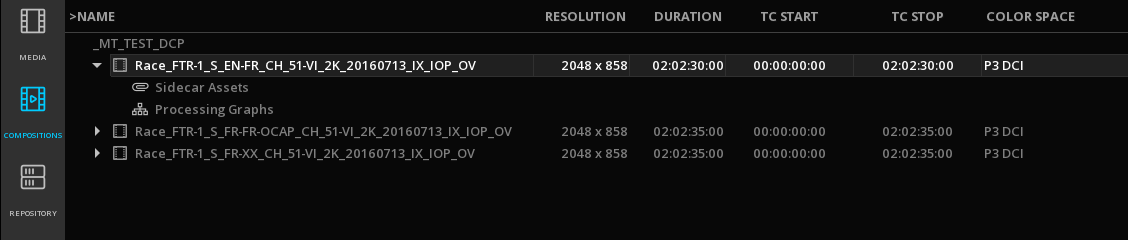
5.4. Compositions Tab
This tab displays all the CPLs available in an IMF or a DCP package.
When importing a DCP or an IMF package, CPLs are listed as compositions:
5.4.1. Sidecar assets
When a package contains SideCar files, they are displayed in the list Sidecar Assets.
→ To open a SideCar asset double click on it. If Windows system recognizes the file type, the associated application will be automatically launched.
5.4.2. Processing Graphs
OPLs present in an IMF package are listed under the Processing Graphs list.
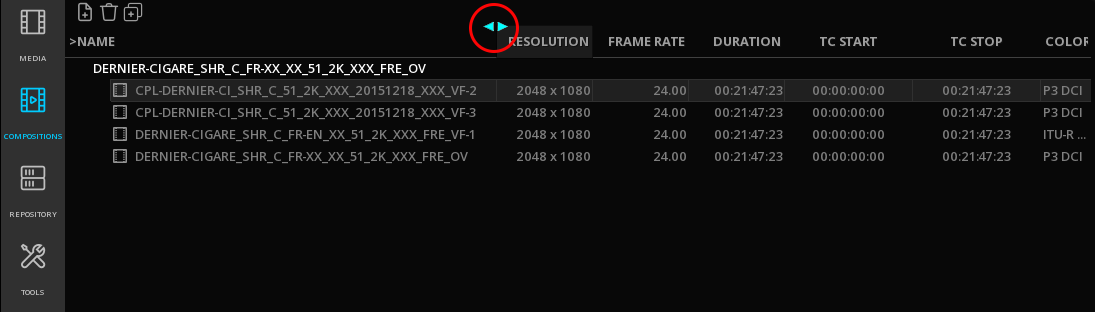
5.4.3. Adjust columns
You can modify the lenght of the columns for the list of composition. Position the mouse until the cursor changes appearance next to the column you want to modify and slide:
To read more about the Compositions management: Compositions .
5.5. Media Inspection
The Metadata Tab of the Command Panel allows the inspection of the metadata embedded in a file: COMPOSITION, CLIP, STATIC and DYNAMIC metadata.
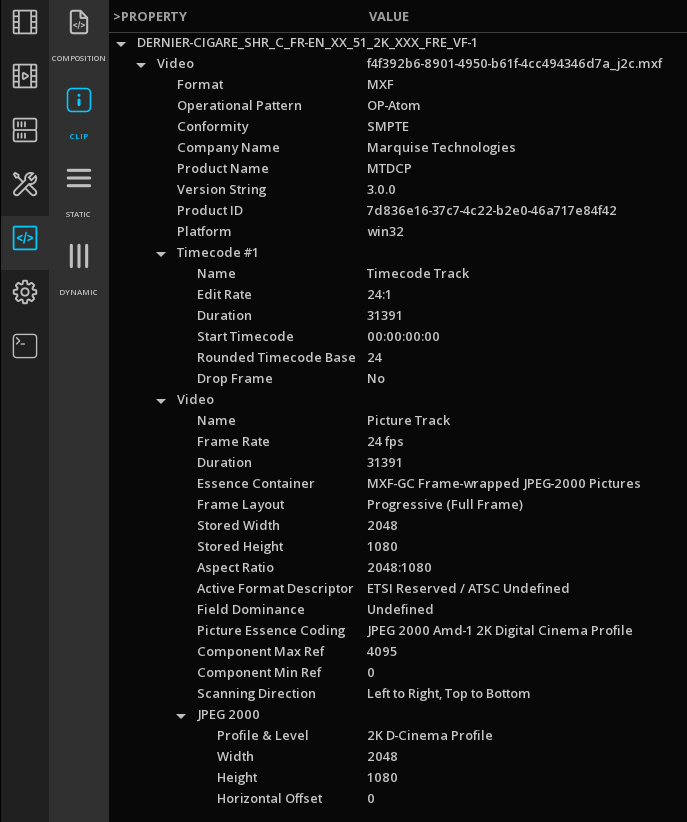
| COMPOSITION |
settings of the composition |
| CLIP |
thechnical metada of the clip |
| STATIC |
technical or descriptive metadata valid for the entire clip |
| DYNAMIC |
technical or descriptive metadata valid for a frame or a scene. |
5.6. Media Metadata Exports
It is possible to export the metadata of a media file.
→ Right-click on a media in the Control Panel / MEDIA tab and choose Save Media Info report from the drop down menu to open the Media Metadata Export windows.
In the file type, select the desired Metadata export:
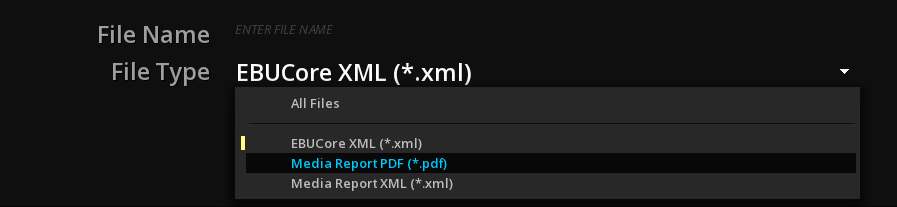
| EBUCore XML |
exports the media metadata in XML following EBUCore specification |
| Media Report |
exports a Media Report in PDF or XML format |
→ Add a name for the file and browse the file system to the desired location and validate with OK
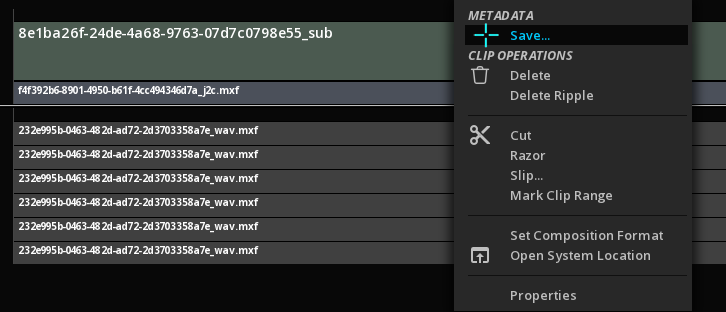
The Media Metadata Export windows can also be accessed from the timeline:
→ Right-click on the desired clip on the timeline and choose Save… from the drop down menu:
6. IMPORTING DCP & IMF
ICE Prime is able to work with complex packages, including multi CPLs and multi PKLs content as well as supplemental packages.
6.1. Importing a DCP
Importing a DCP into a Project is similar to the process of ingesting a DCP into a DCI compliant server. Each DCP has at least one composition playlist (CPL) for the original version and possibly a number of sub versions, each with its own CPL.
Once the DCP is imported within a project, all the elements in the timeline are ready for screening, quality control, etc.
6.1.1. Drag & Drop a DCP
Refer to chapter Media Import Drag & Drop
6.2. Importing an encrypted DCP
When a DPC is encrypted, the first step is to import the package.
Then proceed to the import of the KDM itself, using IMPORT from the bottom menu.
→ Browse directories, select the KDM and click OK.
|
You can filter your search by selecting the type of file: 
|
6.3. Importing an IMF package
Once the IMF is imported within a composition, all the elements in the timeline are ready for screening, quality control, etc.
6.3.1. Drag & Drop an IMF
Refer to chapter Media Import Drag & Drop
|
If the IMF has differential or supplement packages then their additional essences (if any) are imported to the same chosen media folder as the original IMF’s essences. Each CPL of the package will be a Composition of the Project. This way the operator may import a multiple CPLs IMF in a single process and easily switch between the different Compositions. |
7. TIMELINE
ICE Prime is able to display precisely the content of a media or a package on its timeline.

7.1. Displaying the Timeline
To display the timeline, you can use different methods:
→ Click on the  TIMELINE icon, located below the Command Panel
→ Right-clik on the image viewport and select Timeline
→ Use F8 shortcut
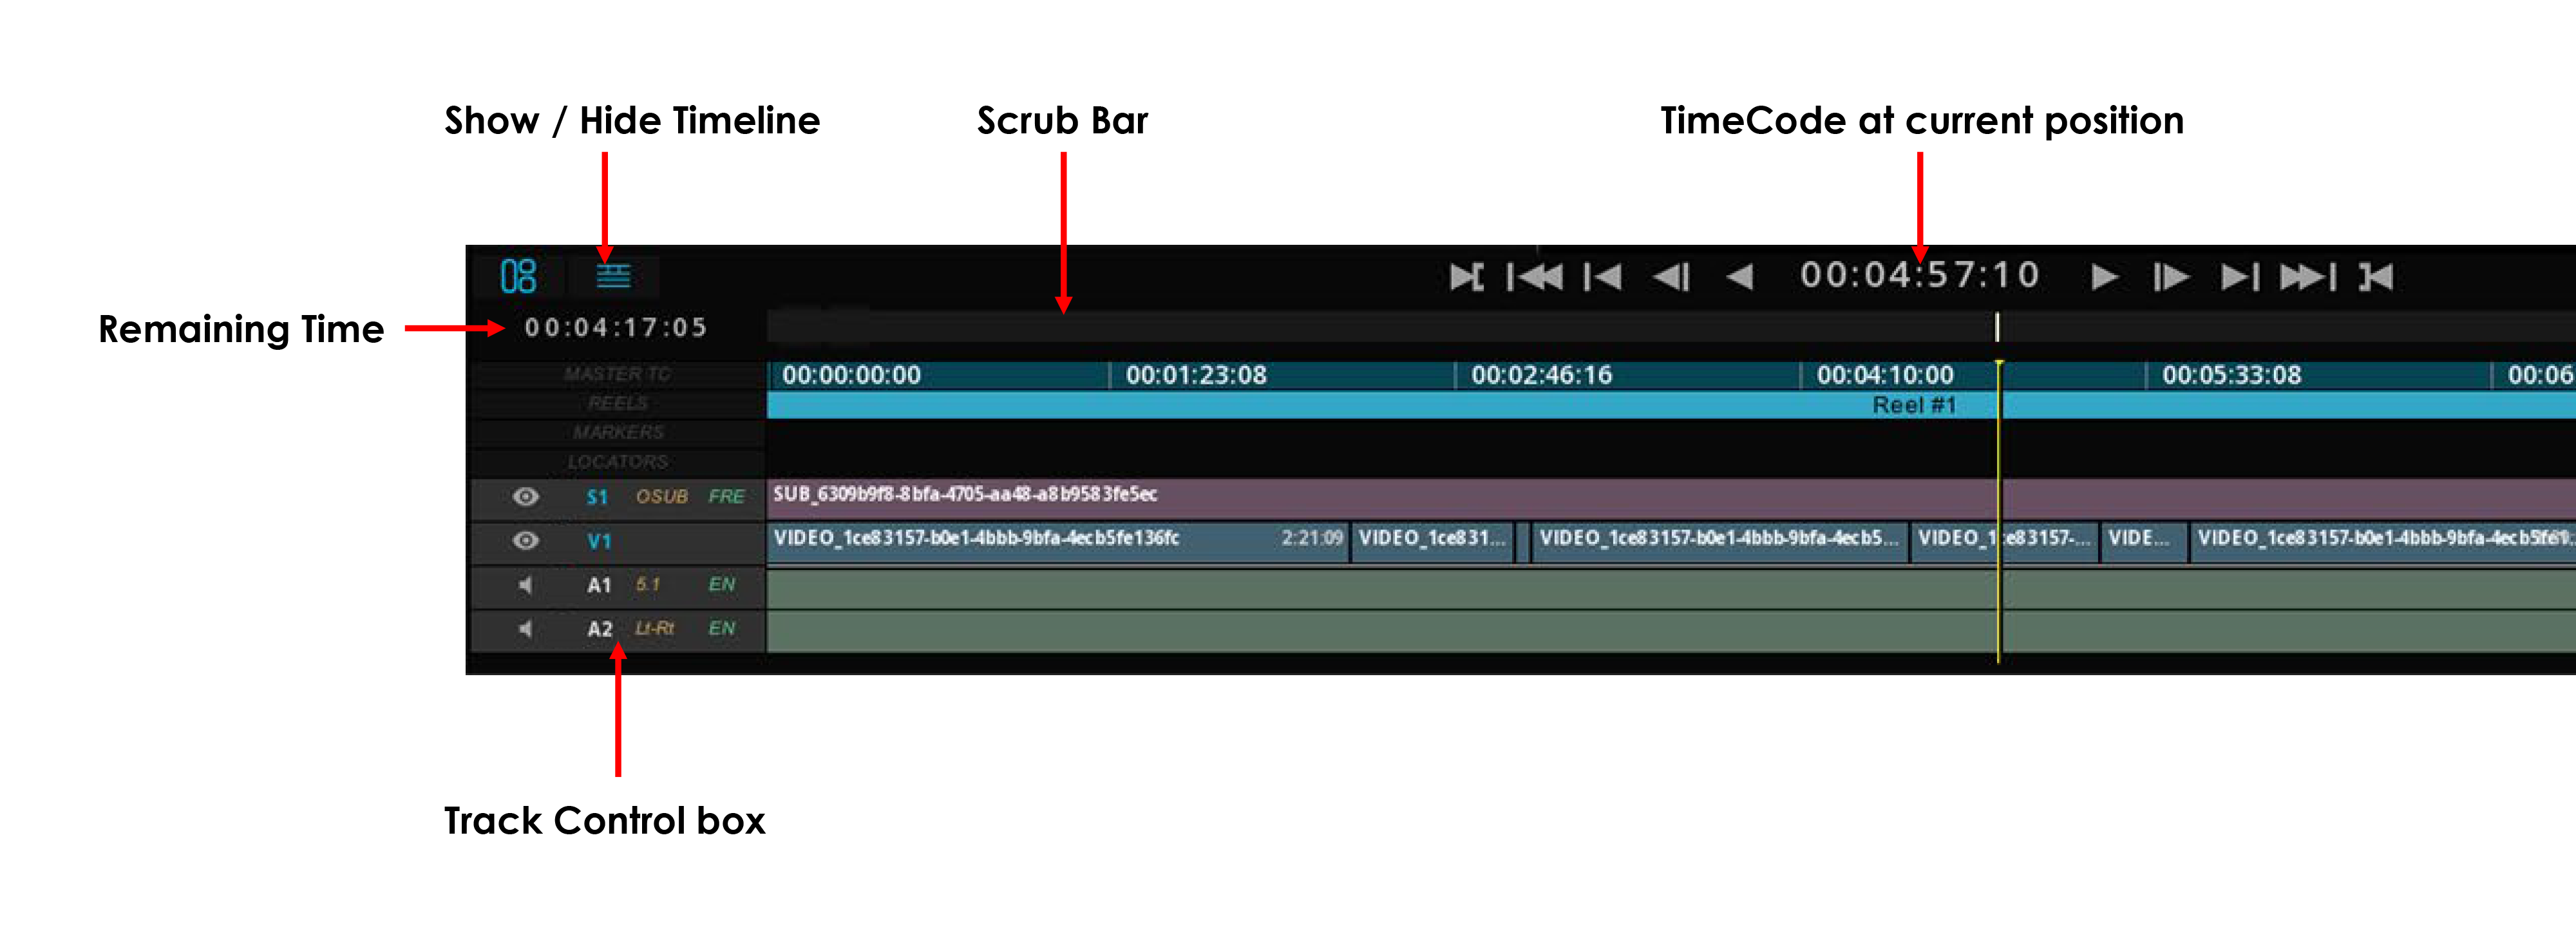

7.1.1. The track control box
This element of the timeline displays the metadata present in the tracks and allows some controls over the tracks.
Track controls
|
Video / Subtitle track enabled |
|
Video / Subtitle track disabled |
|
Indicates an audio track. Audio tracks are managed in the Audio Routing panel. |


Track Types
ICE Prime can display all type of tracks, Video, Audio and Subtitles, but also metadata tracks like Immersive audio, Dolby Vision ISXD track. Those Auxiliary tracks are labeled with an X.
ICE Prime supports an unlimited number of tracks, whatever their type is.
When the media is composed of different clips or segments, they are clearly represented:

7.2. Navigating the timeline
There is several ways to navigate inside a content:
→ Media can be navigated using the scrub bar control:
→ By clicking on any location of the scrub bar
→ When the timeline is displayed, you can use the Playhead to move forward / backward.
→ Use the Transport controls (play, stop…)
7.2.1. Transport Controls
The commands for the Transport controls are the following:
|
Mark IN point |
|
Go back to first frame |
|
Go back last key frame /event |
|
Go back previous frame |
|
Play backward |
|
Play / Stop |
|
Go to next frame |
|
Go to next key frame / event |
|
Go to last frame |
|
Mark OUT |


Changing the Timebase display
The Timebase (or timescale) is by default in timecode mode.
It can be modified to display other time codes or frame information.
The Timeline can be displayed in the following modes:
Normal time Code
Feet + Frame
Frame Number
→ You can toggle the Timebase displays using Alt+T.
Timebase display in Time Code:

Timebase display in Feet + Frame:

Timebase display in Frame Number:

7.3. Compositions
7.3.1. About Compositions
When a media is opened on ICE Prime’s timeline, it is included in a composition.
This composition can be enriched with additional media tracks, and its parameters can be modified.
ICE Prime supports multiple compositions, either coming from a package (DCP or IMF), or compositions manually created.
They are managed in the Command Panel, in the ![]() COMPOSITIONS page.
COMPOSITIONS page.
ICE Prime plays the media based on their metadata.
For example, a double click on a Composition or a specific clip in the Media bin will automatically set the right parameters on the timeline, in terms of frame rate, color space, or image resolution.
However, there is some cases where either the metadata are not present or not correct, and in this case the settings of the composition must be manually changed.
7.3.2. Managing Compositions
Composition Operations from the Control Panel
In the Composition page of the Command Panel, the different compositions are available in a list.
Some operations are directly available from there.
→ Right-click on any composition of the list to display the menu:
| Load in Record |
Load this composition in the Viewport |
| Select All |
Select all the composition in the list |
| Deselect All |
Deselect all the composition in the list |
| Select All by Master Format |
When there is mixed Master Formats in the list, you can select them by type of format |
| Select All by Common Source |
Select all the compositions that have some sources (media) in common |
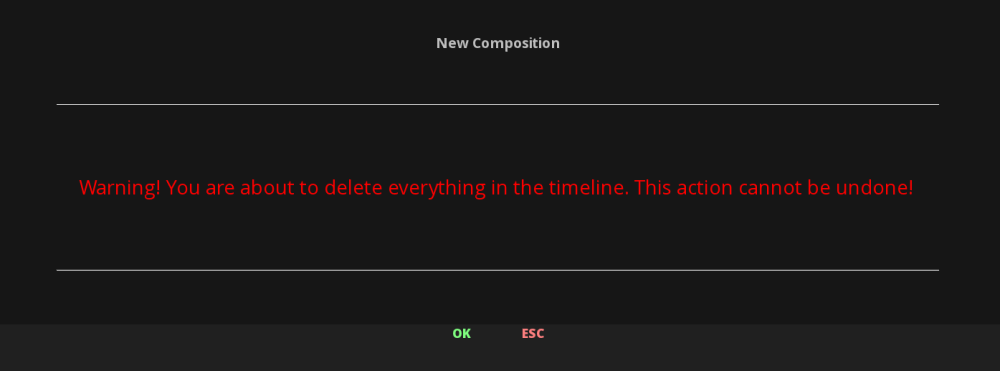
| New Composition |
Create a new composition, with an empty timeline. By default it’s named "New Composition" |
| Delete |
Delete the selected composition(s). |
| Rename |
Allows to rename a composition. |
Composition options from the Timeline
Additional options and shortcut for the display of the media are available from the Timeline.
→ When the Timeline is displayed, right-click on any empty part of it to display the Composition Operations menu:
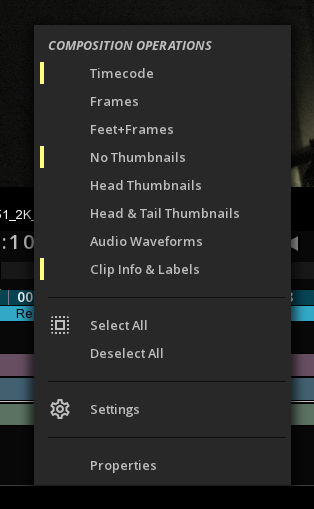
| TimeCode |
Display the timebase of the composition in normal timecode |
| Frames |
Display the timebase of the composition in frames |
| Feet+Frames |
Display the timebase of the composition in feet+frames |
| No Thumbnails |
Display the video clips without thumbnails |
| Head Thumbnails |
Display the video clips with Head thumbnails only |
| Head & Tail Thumbnails |
Display the video clips with Head and Tails thumbnails |
| Audio Waveforms |
Display the Audio waveforms on the audio tracks |
| Clip Info & Labels |
Display names on the clips |
| Select All |
Select all the clips of all the tracks on the timeline |
| Deselect All |
Deselect all the clips of all the tracks on the timeline |
| Settings |
Shortcut to Control Panel / Compositions Settings |
| Properties |
Shortcut to Control Panel / Compositions' metadata |
Create a new Composition
When you select New Composition in the Command Panel, or press Ctrl+N keys, a panel allows you to quickly set the parameters of the composition:
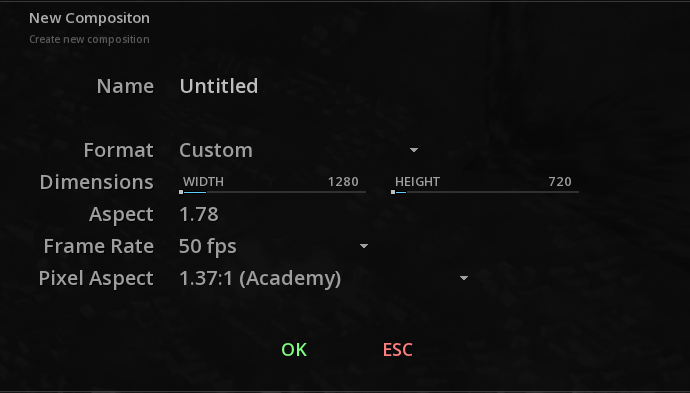
| Name |
Enter a name for the composition |
| Format |
Choose either a Custom format, or a template from the drop down menu. |
Saving compositions
When you assemble different clips on the timeline, you can save them as a composition:
→ Press Ctrl+S and type a name for the composition:
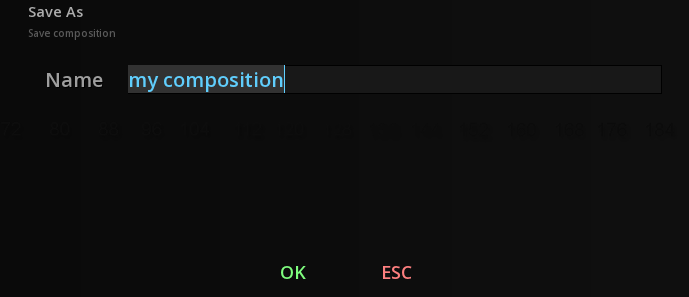
The new composition is then available in the list in the Command Panel.
Any file present in the composition will be saved, would it be a KDM or an external file-based QC report.
|
You can also use this method to create your own Play Lists. |
7.3.3. Composition Settings
The different Composition Settings are available in the Command Panel in the ![]() SETTINGS pages.
SETTINGS pages.
Format

The Format page gives information on the parameters of the current composition: Image Resolution, Aspect as well as frame rate.
It is also possible to change some parameters:
| Pixel Aspect |
For anamorphic content: select the desired aspect ratio of the pixel. |
| Active Area Aspect |
Select the active image area ratio from the drop down menu thus to exclude letter and pillar boxing from any processing or analysis. |
| Safe Area Aspect |
Select the safe area aspect ratio |
| Safe Action and Title |
Define the percentage of tolerance for safe action and safe title in relation with the chosen safe area aspect. Double-clik on the value to edit it or use the slider. |
CMS
This tab is dedicated to the choice of a Color Management System for your current composition. For more information, please read carefully the Color Management System chapter.
Displays
The Display tab allows you to define a Mastering Display or a Target Display for your content.
This is also the place to manage the display’s LUTs.
For more informations, please read carefully the Mastering Display chapter.
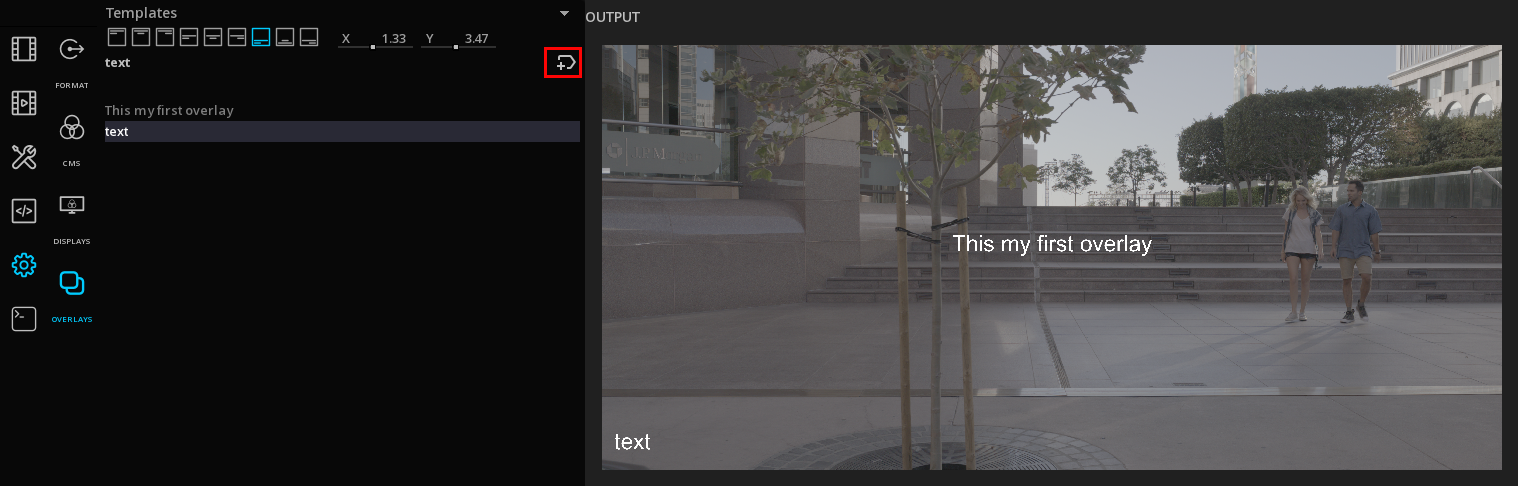
Overlays
You can use Overlays to burn some metadata on the image Timecode, file name, and camera metadata.
Overlays work using text and metadata that you can modify to create burn-ins with a variety of styles.
Add a custom text Overlay
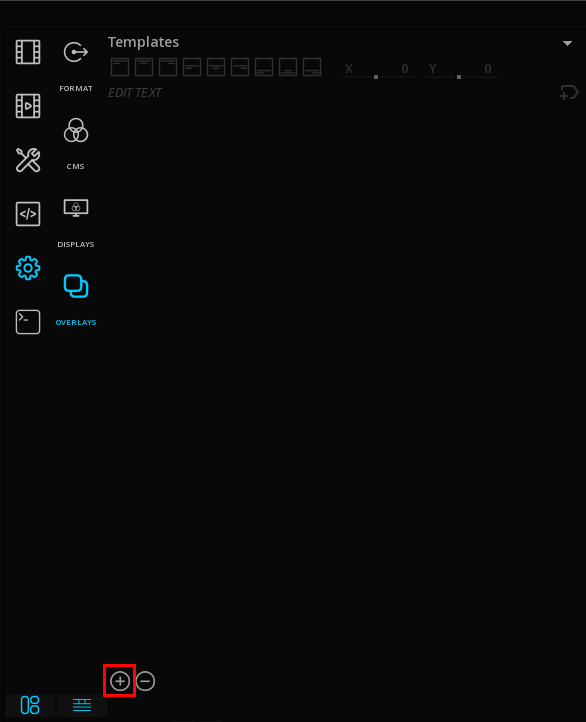
→ Click on + to add a new overlay. By default the tag "text" appears on the list.
→ Select the overlay on the list to edit it:

→ To modify the text, click in the editing text field:
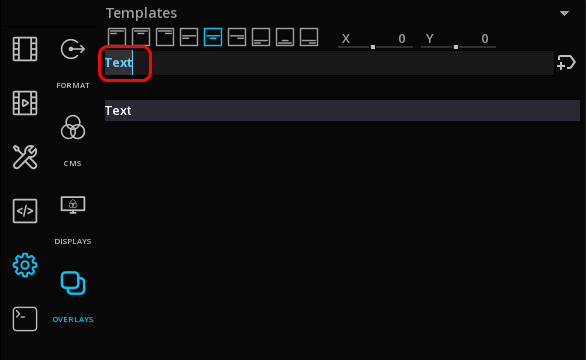
and validate with enter.
You can style the text using the Rich Text Markup specification.
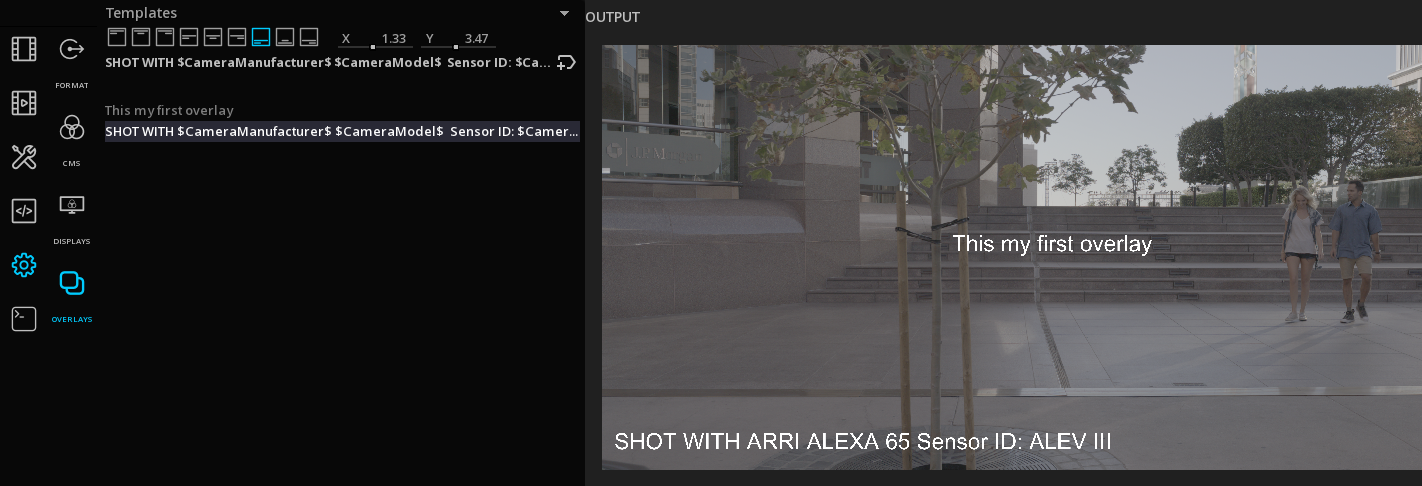
Add a Metadata Overlay
Some important metadata are directly available using metadata tags.
→ To add one, select the overlay in the list and click on +tag icon:
and select a metadata in the drop-down menu:
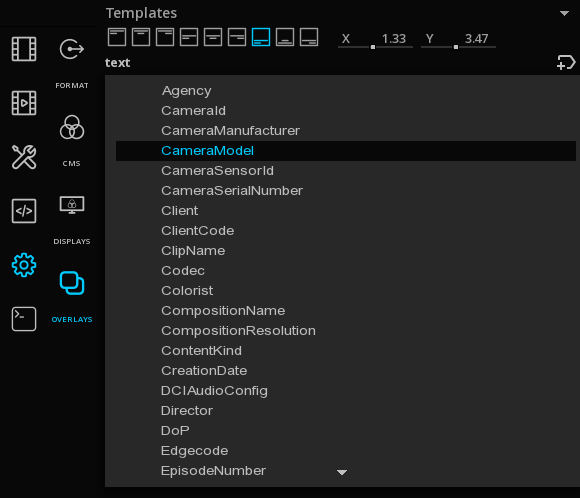
You can add several metadata tags for each overlay:
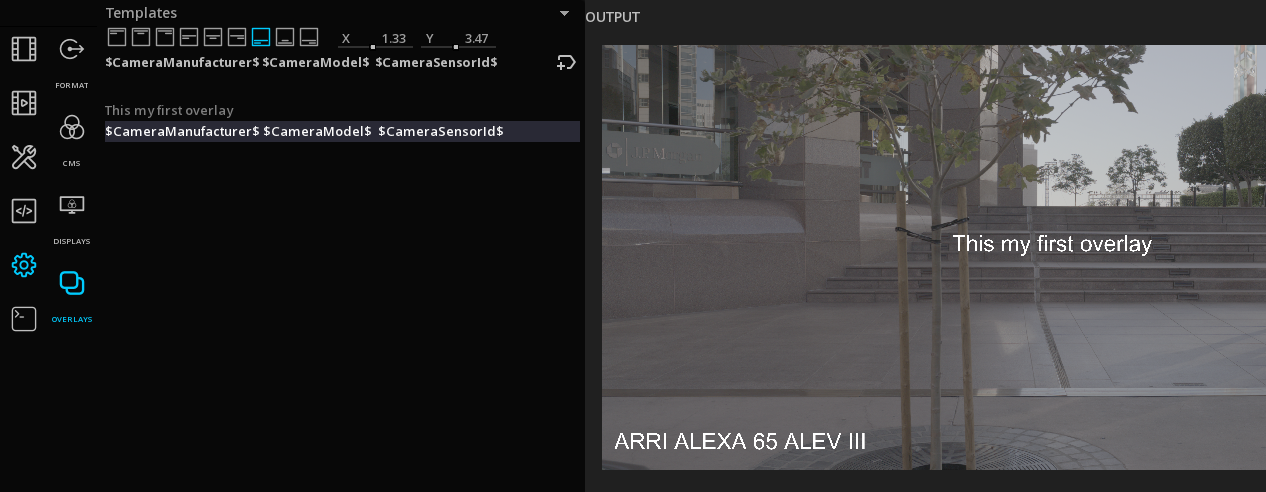
and mix custom text with metadata:
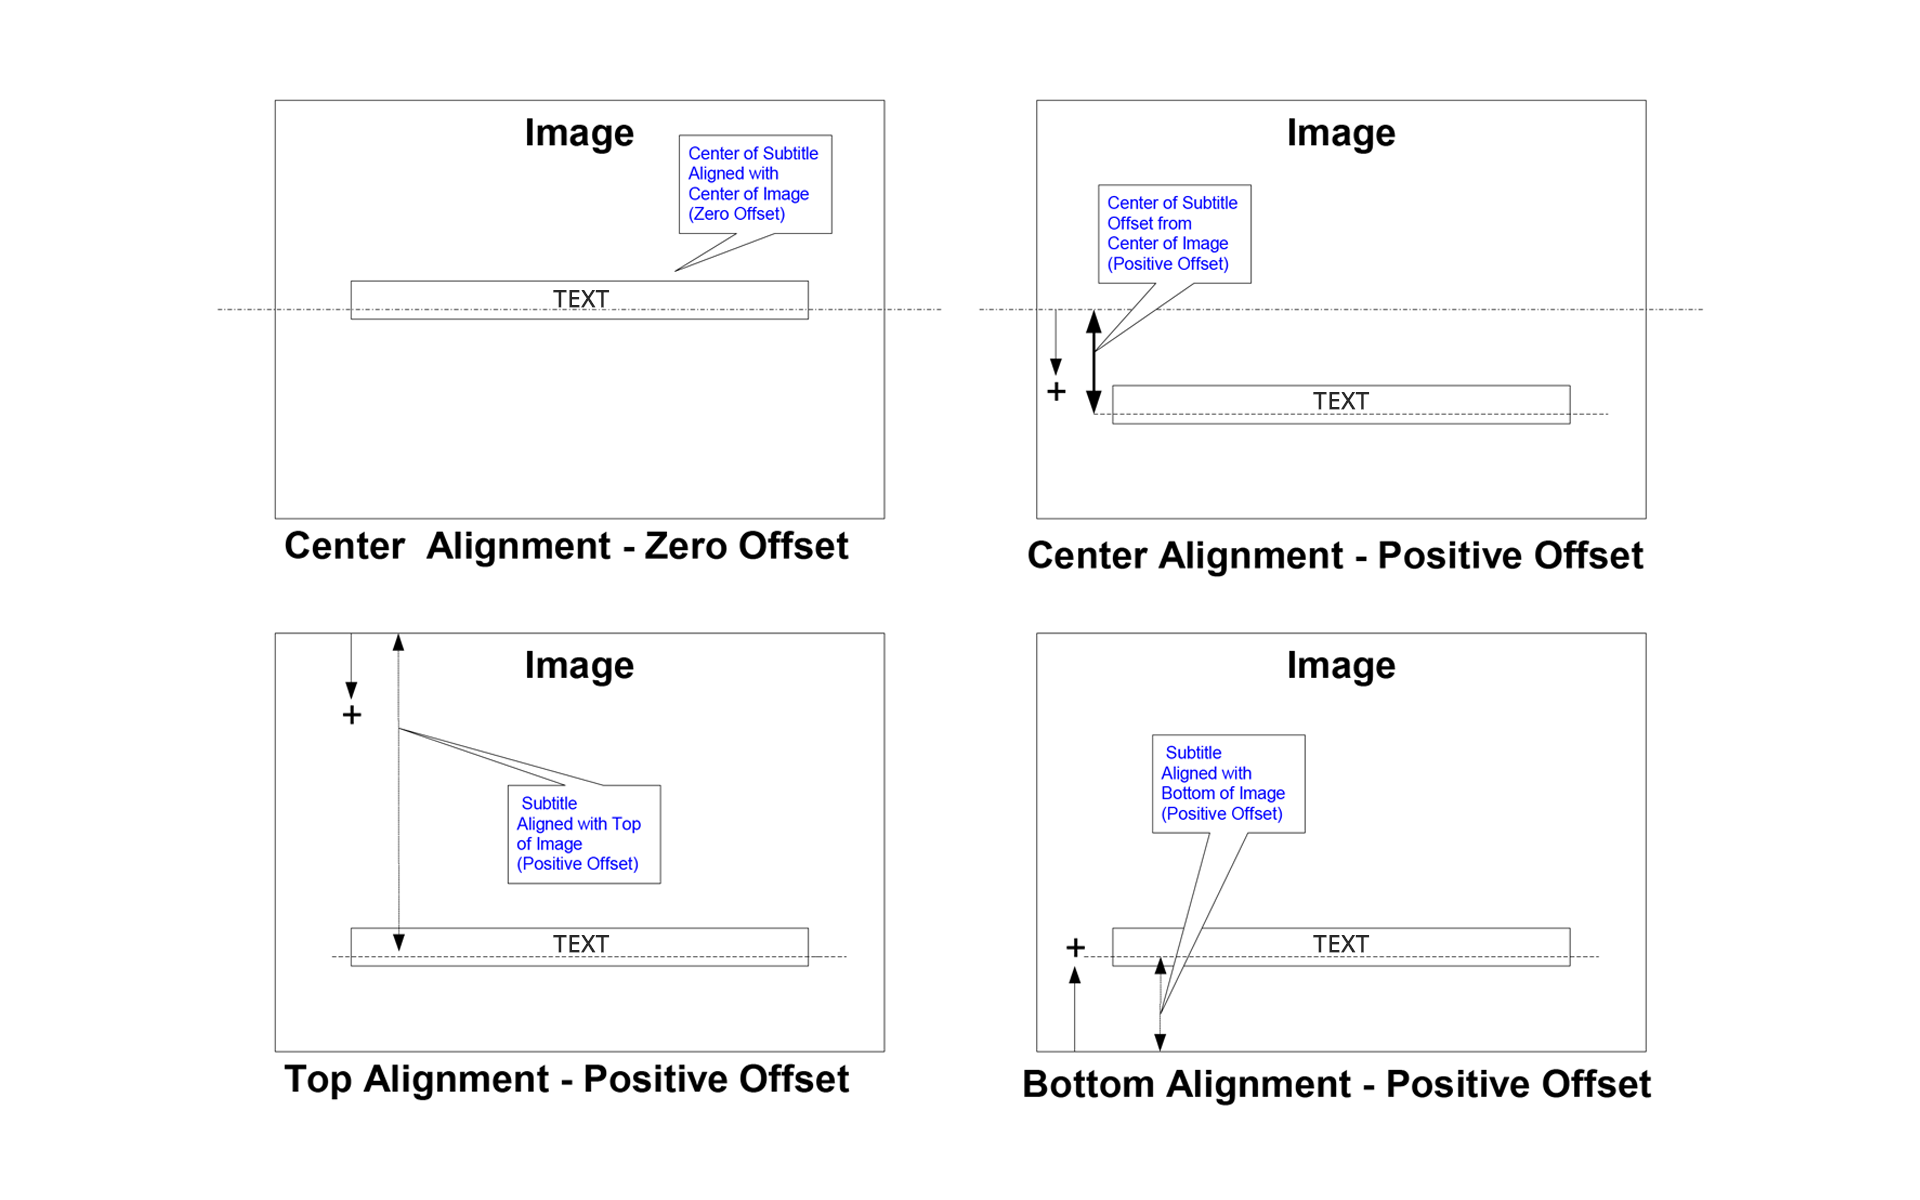
Modifying overlay positioning
The positioning of overlays in the image are defined by offsets to vertical and horizontal positioning.
→ Use the text alignment icons and the X and Y axis to position the overlays at the desired place.
Text Horizontal positioning:
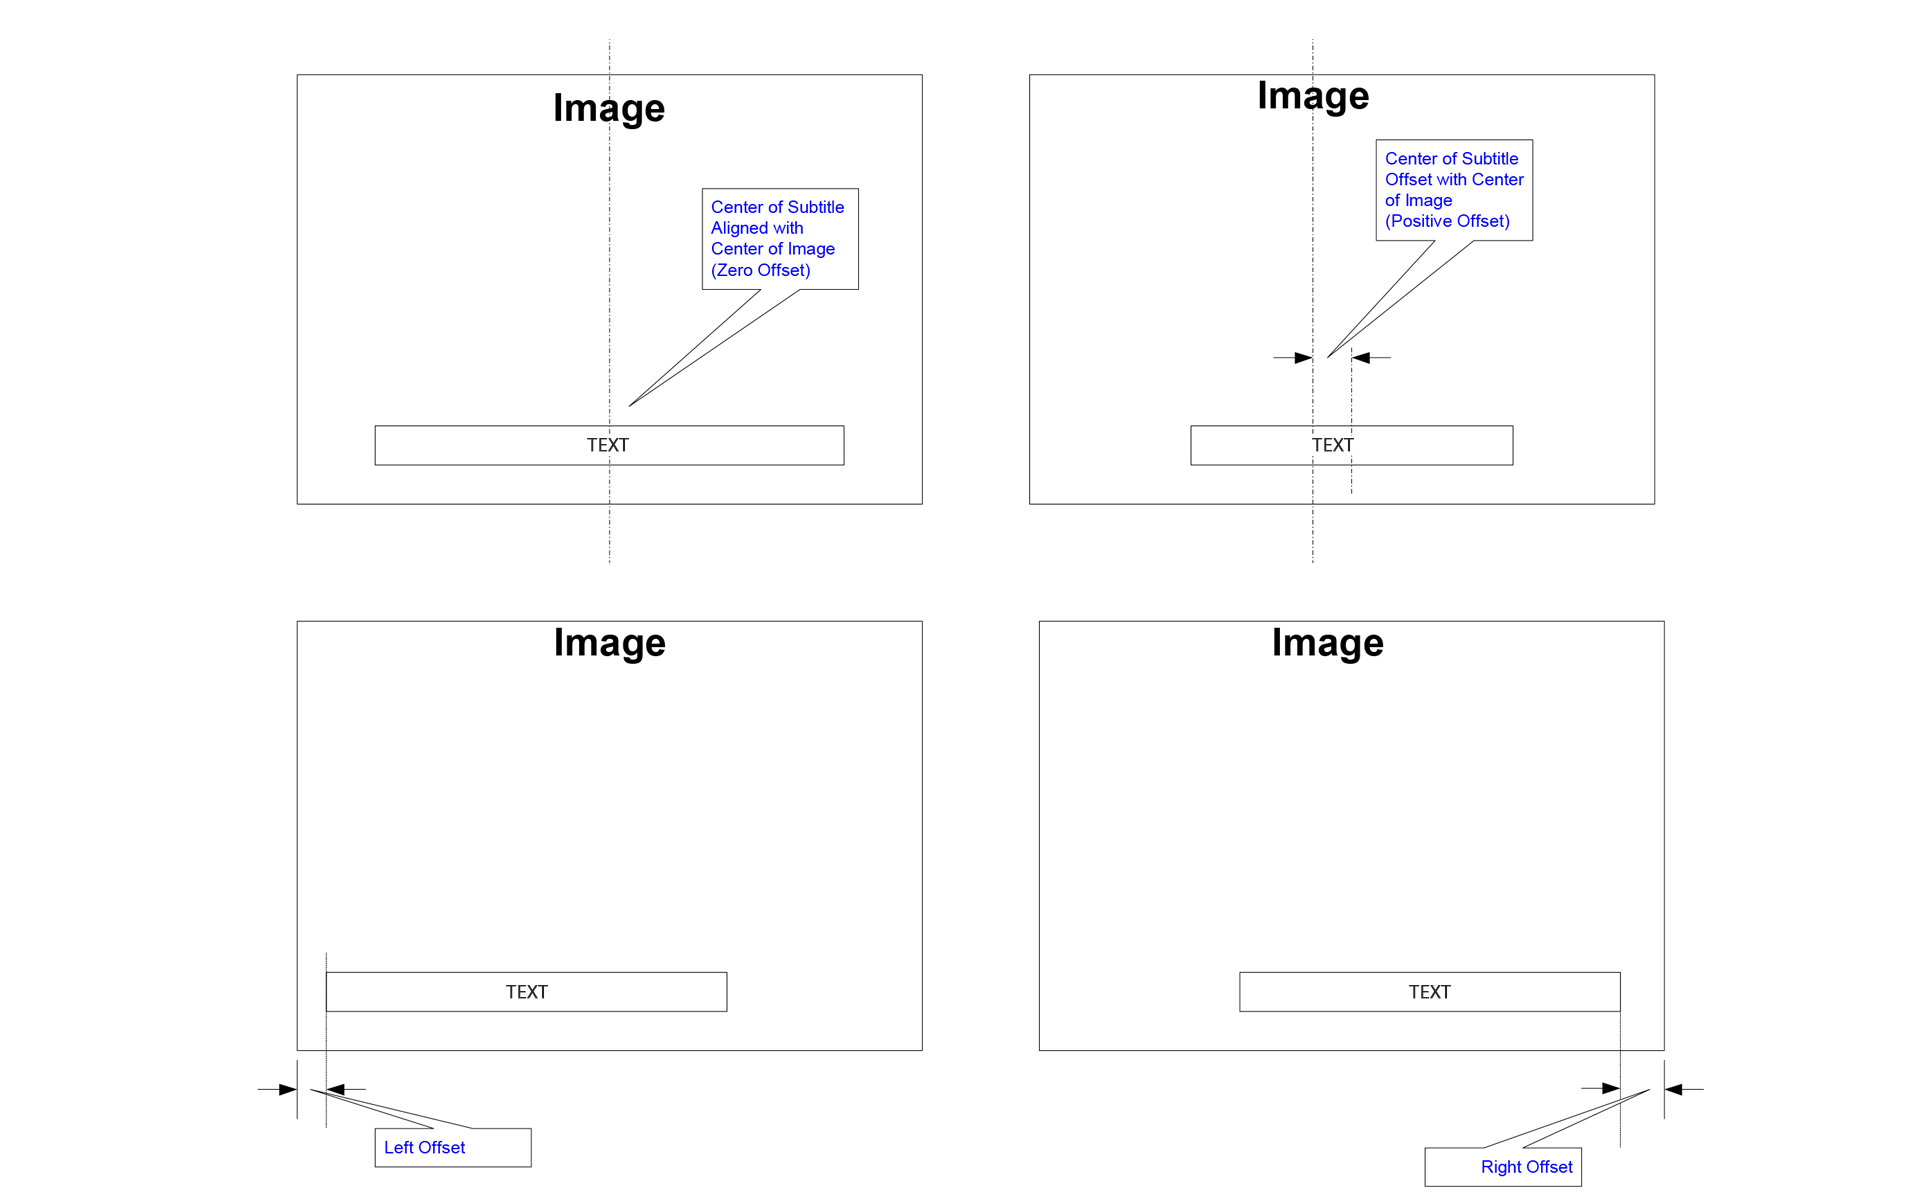
Text Vertical positioning:
Saving Overlay templates
→ To save overlays settings as a template, click EXPORT on the timeline menu and select in File Type "Marquise Technologies Overlays Template":
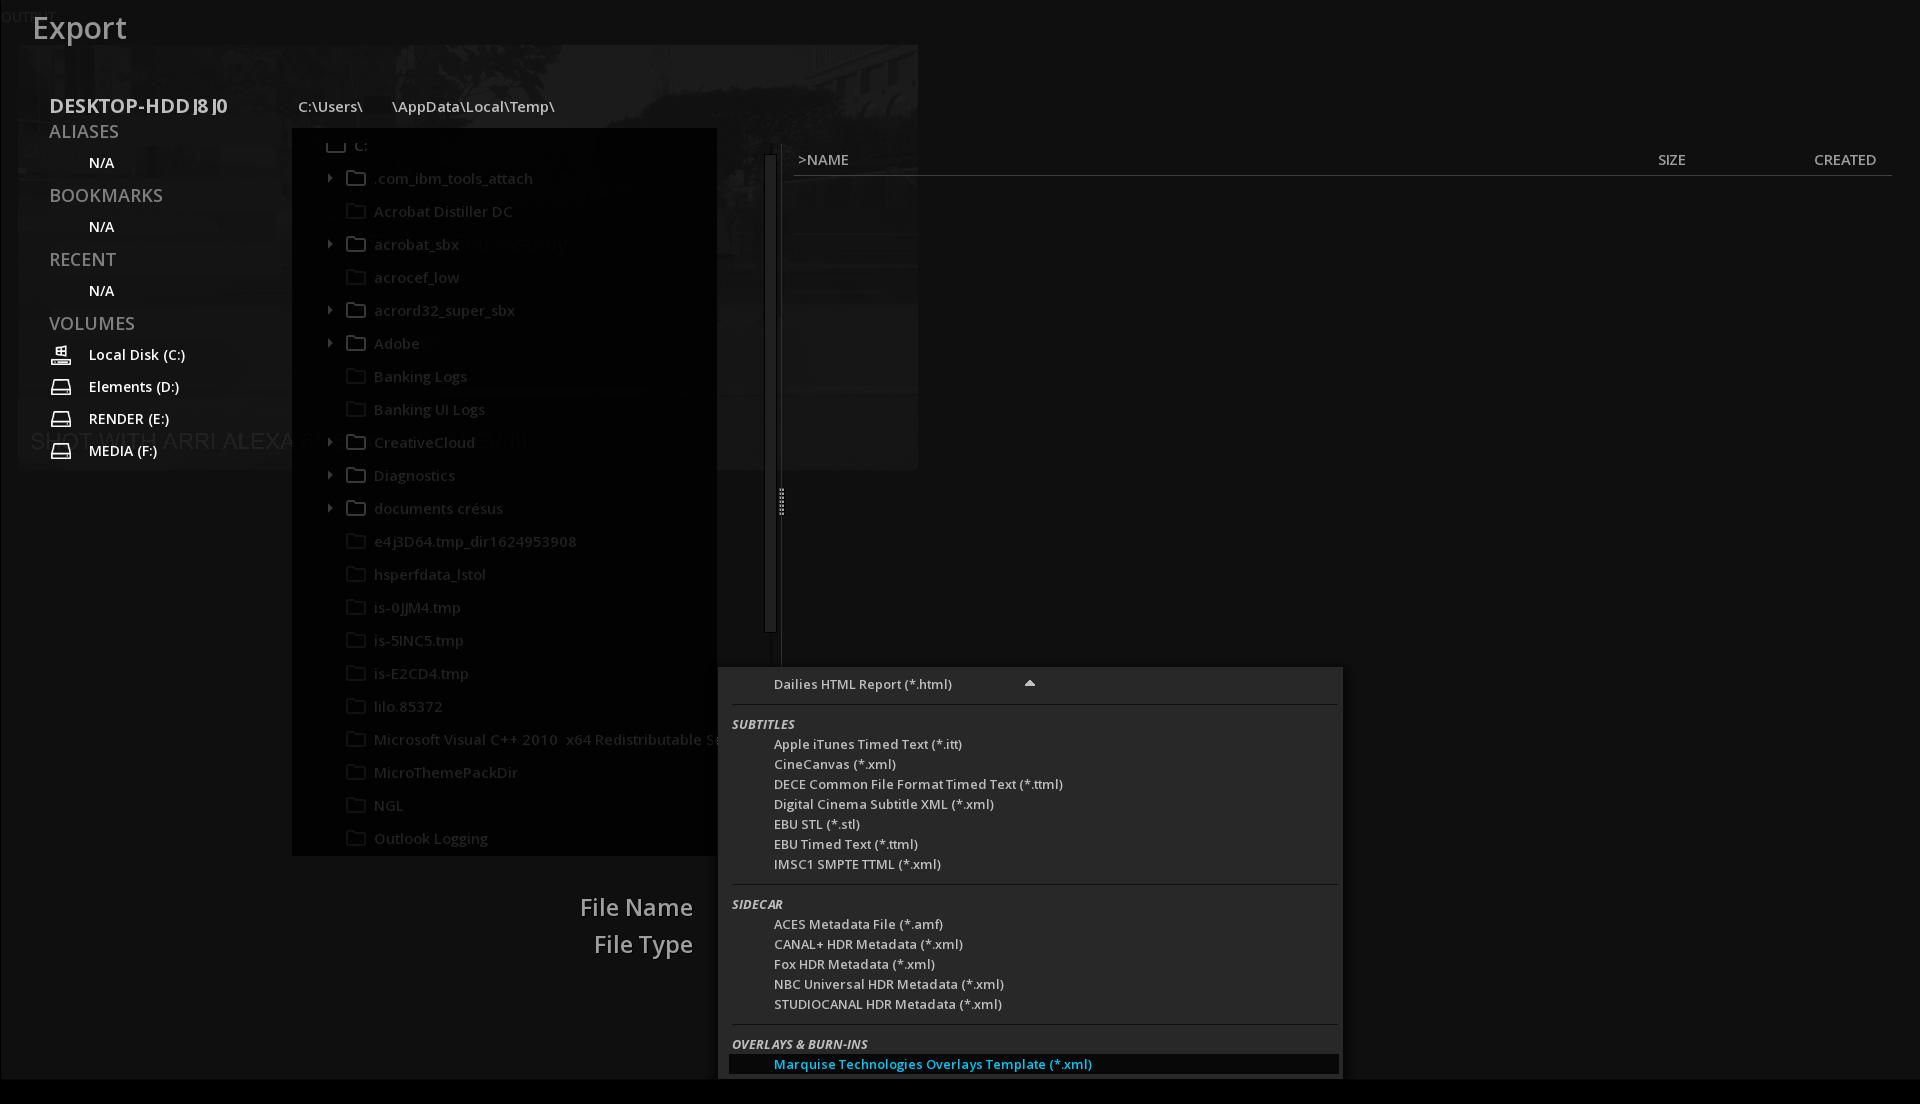
→ Select a location to save the template (by default it will be saved in the temporary folder of the User).
→ To upload a saved Overlay template, click IMPORT on the timeline menu and browse the file system. You can use the File Type info to narrow the search.
|
To display an Overlays Template in the Overlays Template drop-down menu, it must be saved in the Software installation directory folder C:\Program Files\Marquise Technologies\$software_version$\resources\templates\overlays |
→ Click on Templates to open the drop down-menu and select a template:
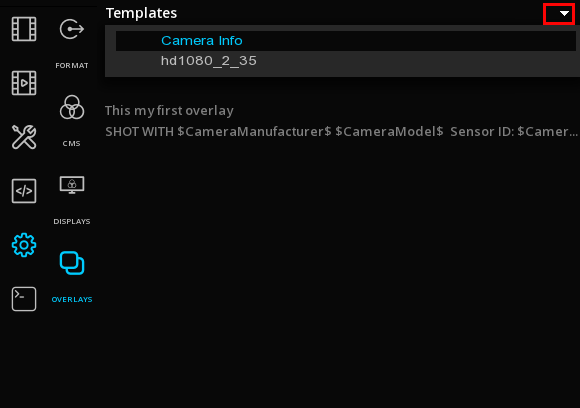
A list of overlays for this template is displayed.
→ Click on the desired overlay to modify it.
7.4. Playback
7.4.1. Playback Modes
There is several modes for playback available:
|
Play Once |
Play the current composition just once |
|
Play ping pong |
Play backward then forward the composition, endless. |
|
Play Loop |
Play back the current composition, endless |


The “Play once” mode is set by default.
→ To toggle to the other modes, click on the icon until the desired mode is displayed.

7.4.2. Playing Back a Marked Region
→ To play a specific region of the composition, mark the desired range with IN and/or OUT points:
| IN point | OUT point | Description | Shortkey |
|---|---|---|---|
SET |
SET |
Play forward in the marked region |
Alt+Space |
SET |
SET |
Play backward in the marked region |
Alt+Ctrl+Space |
SET |
None |
Play forward from the IN point to the end of the compositio |
Alt+Space |
SET |
None |
Play backward from the end of the composition to the IN point |
Alt+Ctrl+Space |
none |
SET |
Play forward from the beginning of the composition to the OUT point |
Alt+Space |
none |
SET |
Play backward from the OUT point to the beginning of the composition |
Alt+Ctrl+Space |
|
If the PlayHead is inside the marked range, the playback starts at the PlayHead origin |
7.4.3. Playback Information
The timeline’s interface displays some playback information such as:
| FPS |
Current frame rate of the playback in frames per second. |
7.4.4. Playback of image sequences at a manual frame rate
When an image sequence has no frame rate information in the metadata, it is possible to manually set a frame rate:
-
Start by importing the image sequences (drag/Drop)
-
Create a New composition (Ctrl+N) and set the frame rate using Custom or select a preset from the drop-down menu
-
In the media bin, on the image sequence, right-click and select "Add as Media track".
7.5. Events Viewer
ICE Prime offers another navigation tool in addition of the timeline, the EVENTS VIEWER.
The Event Viewer displays the cuts, clips, segments, reels or chapters available on the timeline in a chronological manner with a preview of one of their frames.
→ To show / hide the Event Viewer, click on EVENTS on the bottom menu.
![DoVi][event](images/ice_prime_dovi-cut2.png)
→ Alternatively, you can use the E key shortcut.
The Event Viewer does not visually represent the length of a clip (or shot). The diagram below shows the difference between the timeline and the Event Viewer representations :
The current event (at playhead’s location) is always centered. To distinguish it from the other surrounding events, it has a light-blue blinking border.
The current event also has a display of the current frame number as well as the total number of frames. This indication is updated as you navigate through the event.
→ To quickly go to any of the visible events, you simply need to double-click on its thumbnail. The PlayHead will immediately move to the selected event and its first frame will become the current frame. The new event also becomes the current one and it is centered in the Event Viewer. The various information usually displayed on the current event is also updated to reveal the current status.
→ You can also use the PlayHead on the timeline, use the transport controls. There is cursor on the top of the current event selected to let you know where you are regarding the duration of the event.
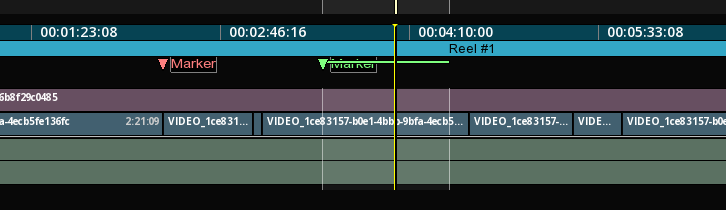
7.6. Reels
Reels, Segments or Chapters are often present in a variety of files. ICE Prime display them in the timeline, on the Reel track, but also on a dedicated page in the Command Panel.
→ To access the Reels panel, click on the TOOL tab of the Command Panel.
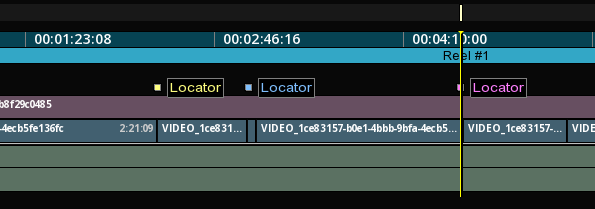
In ICE Prime, the reels or segments are identified by a colored bar on the TimeLine:

7.6.1. Navigating through Reels
You can navigate from Reel to Reel using different options:
→ Double click on a time code in the Reels' list for the PlayHead to jump directly to the fist frame of the reel in the TimeLine.
→ Use shortcuts Alt+Ctrl+Page Up| for Next Reel and Alt+Ctrl+Page Down| for Previous Reel
Additionally, when the PlayHead is positioned on a particular Reel, it is highlighted in the Reels' list.
7.7. Markers
Markers define regions of a composition that have a specific meaning.
Typical information located by Markers are for example First frame of Credit, or Commercial break.
→ To access the Markers panel, click on TOOLS in the Command Panel:
7.7.1. Adding markers
→ To Add a Marker, position the Playhead on the desired timecode and in the Markers panel select a color and click +. The Marker is set for a default duration of 1 sec.
→ To mark a range, first define your range and in the Marker panel click +.
→ To delete a Marker, select it in the Markers' list and click -.
Markers are represented in the TimeLine by colored triangles and positioned in the Marker’s track:
7.7.2. Navigating through Markers
You can navigate from Marker to Marker using different options:
→ Double click on a time code in the Markers list for the PlayHead to jump directly to the related frame in the TimeLine.
→ Use shortcuts Shift+U for Next Marker and Alt+U for Previous Marker
Additionally, when the PlayHead is positioned on a particular Marker, it is highlighted in the Marker’s list.
7.7.3. Editing a marker
SMPTE markers labels are supported. To add some, select the desired Marker in the list and click on Default on the Type column.
This action display the Markers drop down menu.
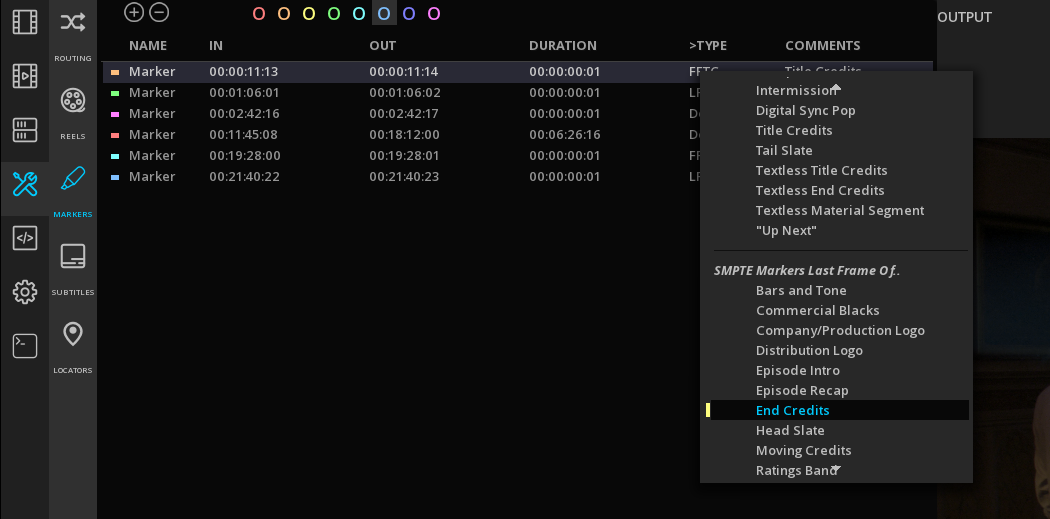
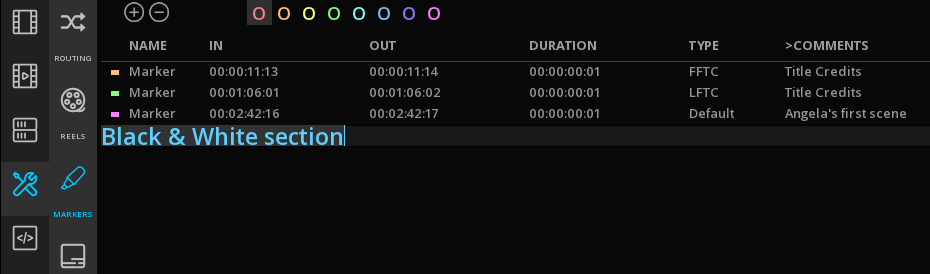
You can also add custom comments.
Select the desired Marker in the list and click on Default on the Comments column and add your custom text:
7.7.4. Moving Markers
You can move or change the duration of a marker directly in the timeline:
→ Position the mouse on the IN or OUT point of the marker until the cursor shows  and move the marker to the new position.
7.7.5. Exporting / Importing Markers
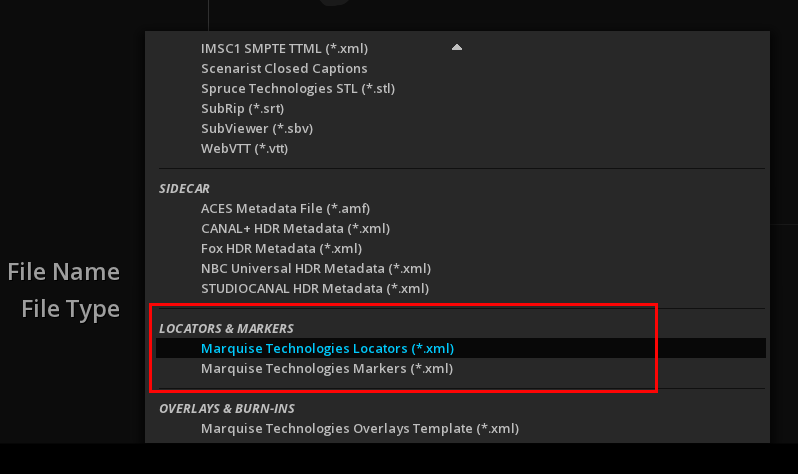
Save Markers
It is possible to export the markers information in XML:
→ Click on EXPORT at the bottom of the TimeLine and choose Markers in the File Type drop-down menu:
→ Choose a location for your file and enter a name.
→ Validate with OK.
Import Markers
→ To import a Markers file, click on the IMPORT at the bottom of the TimeLine and choose Markers in the File Type drop-down menu.
→ Browse the folder tree on your left, select the file and click OK.
|
Only Markers created using ICE or MIST can be loaded. If you want to import an external file, you can use the Locators. |
7.8. Locators
If they are similar to the Markers, Locators are only used for custom comments.
→ To access the Locators panel, click TOOLS in the Command Panel:
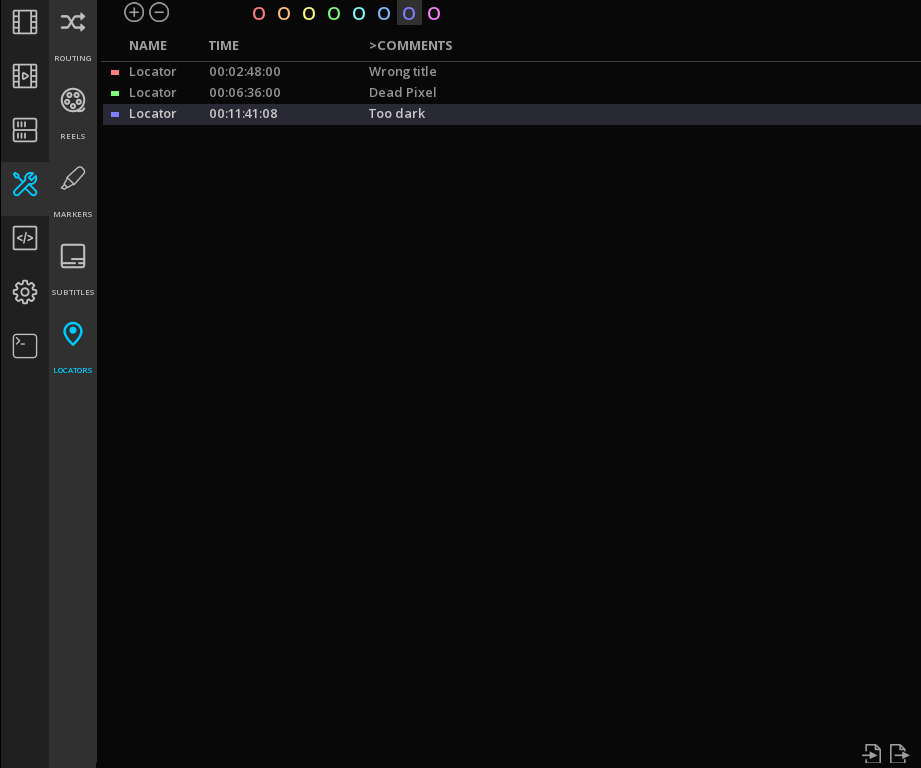
Locators are represented in the TimeLine by colored squares ans positioned on the Locators' track:
7.8.1. Adding Locators
→ To Add a Locator, position the Playhead on the desired timecode and in the Locators panel select a color and click +.
→ To delete a Locator, select it in the Locators' list and click -.
|
You can create several Locators at the same timecode, however on the TimeLine only the last Locator entered will be displayed. |
7.8.2. Navigating through Locators
You can navigate from Locator to Locator using different options:
→ Double click on a time code in the Locators list for the PlayHead to jump directly to the related frame in the TimeLine.
→ Use shortcuts P for Next Locator and Alt+P for Previous Locator
Additionally, when the PlayHead is positioned on a particular Marker, it is highlighted in the Marker’s list.
7.8.3. Editing a Locator
→ Select the desired Locator in the list and click on the empty field in the Comments column and add your custom text.
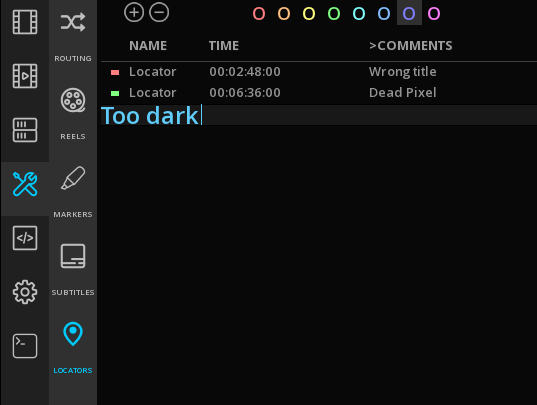
→ To rename a Locator, double click on its name and enter the new text.
7.8.4. Moving Markers
You can move a Locator directly in the timeline:
→ Position the mouse on the locator until the cursor shows and move the locator to the new position.
8. COLOR MANAGEMENT
ICE Prime offers advanced color management for the purpose of viewing a variety of media according to their color spaces on different devices, and also in order to simulate their output using a different colors space, for example simulating of the conversion of HDR10 into HLG.
This chapter covers the different Color management systems available and their settings, as well as the HDR monitoring workflows.
8.1. About Color Management in ICE Prime
8.1.1. Definitions
The Color Management System defines the working color space of the composition (also referred as Workflow), regardless of the source color space or the desired output color space.
- Source color space
-
The color space used to encode the source media. Depending on the format, the color space may be available as a metadata. If so, it will be automatically identified.
For example, if a content in HDR is loaded in the timeline contains HDR color space information, the viewport will display the HDR10 logo. In some cases, like working with image sequences where no color space information is carried in the files, it will be necessary to define it manually. - Workflow
-
The color space of the composition itself. It can be the same as the source or not. By default if the source color space is identified from the format metadata, the composition will automatically reflects it in the viewport.
Numerous tools are linked to the workflow chosen, like the image scopes which scale will be automatically set according to the active workflow.
The workflow can be a custom one, where the user chooses the color primaries and the EOTF, or a Preset where all the parameters are already set for working in SDR, HDR or for the Digital Cinema. - Output color space
-
The output color space behavior depends on the type of workflow chosen, (the composition) and not on the source color space. If any color space conversion is required for the output, it will be done from the workflow settings, and not the source settings.
8.1.2. Selecting a CMS
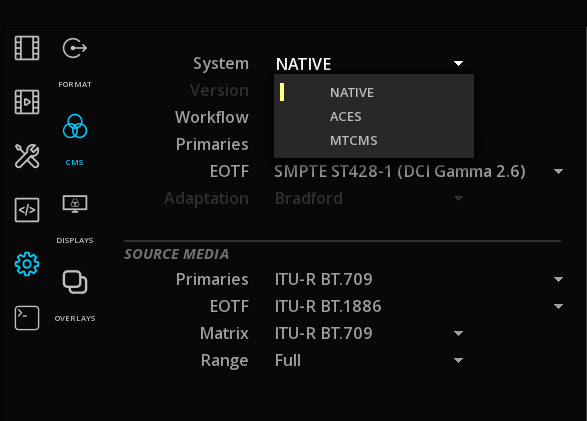
There is 3 types of color management systems available with ICE Prime:
| Native |
The color space of the source is used as is and no color space conversion is applied on the output. |
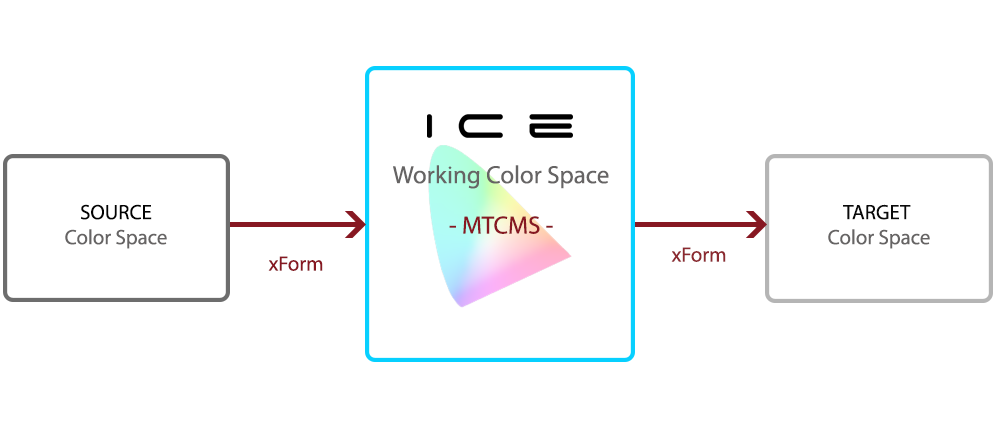
| MTCMS |
The Marquise Technologies CMS is used to simulate advanced color conversions. |
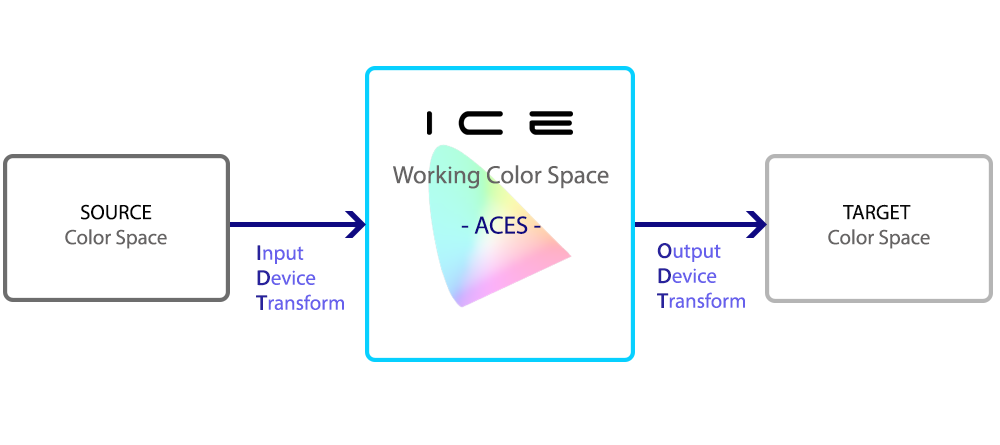
| ACES |
Allows workflows in Academy Color Encoding System. |
You can select them in the
8.1.3. Native CMS
Using the Native CMS, the media is displayed as is and no color space conversion is done on the composition.
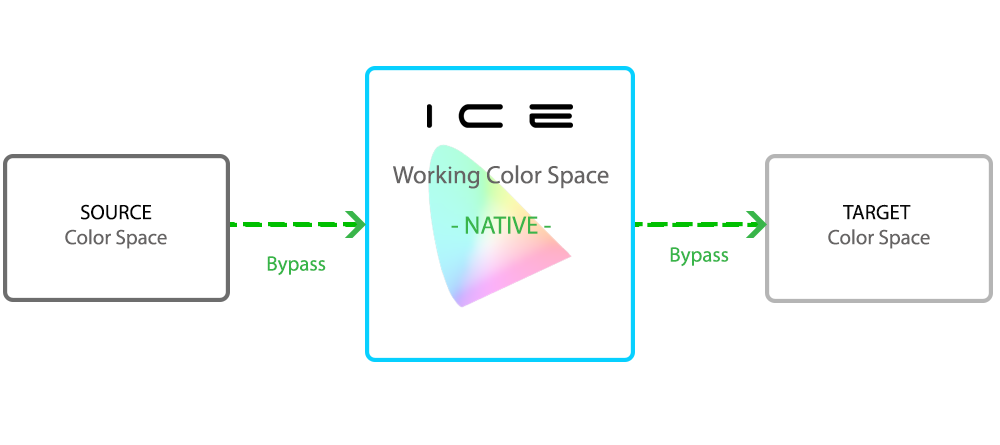
With this mode it is however important to set the Worklfow accordingly, in order to have the full tool set of image analysis in line with the content.
8.1.4. MTCMS
The Marquise Technologies' Color Management System is a proprietary color management system allowing state of the art color conversions.
For more precision and reliability, MTCMS uses industry standards to compute in 32 bit-float on-the-fly the exact values for every possible color. No interpolation is done when using a LUT.
|
Using MTCMS, it is necessary to indicate what are the color parameters of the source media, in order to be able to perform the accurate color transformation. See Source characterization |
8.1.5. ACES
ACES, for Academy Color Encoding System, has been developed by AMPAS (Academy of Motion Picture Arts and Sciences) with the intend to help preserve the color integrity of the content from shooting to archiving.
Specific algorithm allows any kind of source to be processed within the controlled environment of the ACES color space and for a specific output.
See Working in ACES
8.2. CMS Settings
Depending on the the CMS and the workflow chosen, the parameters displayed in the page can vary.
The full paramaters are listed below, however you may need to refer to other chapters for their understanding.
| SySTEM |
Select the Native, MTCMS or ACES system |
| Workflow |
Define the Color space of the composition:
|
| Adapatation |
Select the chromatic adaptation. |
| Dynamic Tone Mapping |
Select the version used for Dolby Vision metadata. |
| Safe Gamut |
Defines the color space used for marking safe boundaries in the scopes. |
| Min (cd/m2) |
Defines the minimum authorized luminance in nits. |
| Max (cd/m2) |
Defines the maximal authorized luminance in nits. |
| Content Light Levels |
Max FALL and Max CLL information can be manually entered here, if the media does not carry that information. |
| Timed Text Color Space |
See HDR Workflows. |
| Timed Text Gain |
See HDR Workflows |
8.2.1. Source Characterization
Working in MTCMS requires to define the colorimetric information of the sources placed on the timeline for reference for all operations of color conversion simulation.
ICE Prime parse the existing metadata of the media, so when a color metadata is present in the file, ICE Prime will automatically load it as current Source settings. If not, you need to characterize the source manually.
The source settings are defined in the

| Color Space |
Select the source color space from the drop down menu |
| EOTF |
Select the EOTF (Gamma) used for the source media from the drop down menu |
| Range |
Choose the range (Head or Full) from the drop down menu. For more information about the range, see Color Range |
|
In Native mode, only the Range parameter is available. |
|
In ACES mode, the Source parameter is the IDT. |
8.2.2. About Color Range
ICE Prime always computes in FULL range internally meaning that:
-
If HEAD range is selected, ICE Prime will scale the legal range to fill the FULL range.
-
If FULL, range is selected, ICE Prime will keep the native range of the media.
When no information of range is present in the media, the FULL range will be set by default, in order to avoid any additional compression if the source is indeed encoded as FULL content but with no metadata about it.
Be careful with this setting because your output may have levels that are not correct.
|
Use the Histogram ( |
Read also About Color Range in the Support Portal’s Knowledge Base for additional information.
8.2.3. About Chromatic Adapatation
ICE Prime supports different chromatic adaptation also called Color Appearance Model (CAM).
This adaptation makes it possible to match the original RGB color coordinates of the DSM to equivalent CIE XYZ coordinates. These colors are not matching from a colorimetric point of view but rather from a perceptual point of view.
This is why ICE Prime offers different methods that will meet the needs of each content. Select a method to apply for adapting the white point of your source media to the one set in the MTCMS:
| XYZ Scaling |
XYZ Scaling is an old algorithm generally considered to be less efficient than the new ones. |
| Bradford |
Bradford is most advanced than Von Kries and XYZ. Because of the varying color constancy of the samples, the algorithm was designed so that corresponding colors represented the same appearance under the different illumination sources, and not necessarily the same sample. |
| Von Kries |
The algorithm assumes that chromatic adaptation is indeed an independent gain control of the cone responses of the human visual system and that the scaling is based on the ratio of the cone responses of the illuminants. |
8.3. Displays
The Display page allows to manage the Mastering Display paramters, the Target Display and the Viewport Display.
The settings are available in the
8.3.1. Mastering Display
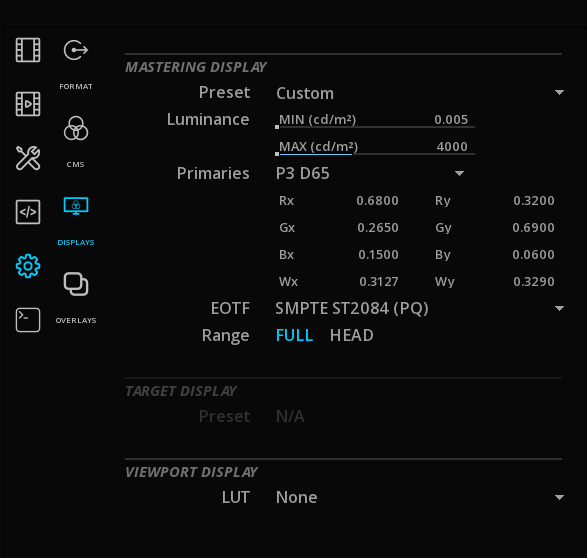
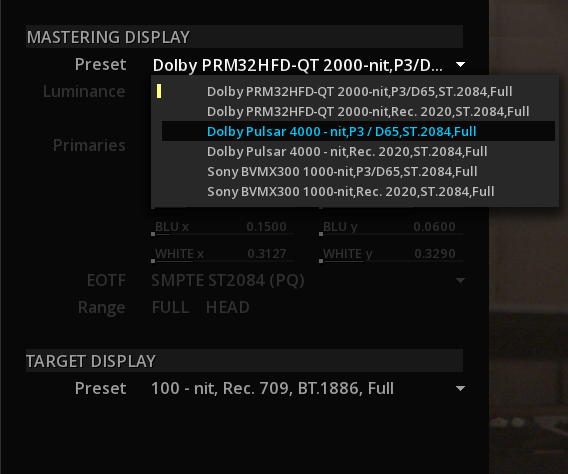
Setting the Mastering Display for HDR workflows
When working in HDR, the Mastering display is used to describe the capabilities of the display used to master the content : CIE (x,y) chromaticity coordinates for RGB primaries, White Point, and min/max luminance of the mastering display.
The characterization of the mastering display based on the SMPTE ST-2086 standard is a key element when working in PQ (ST-2084) and Dolby Vision. These statics metadata are critical for HDR mastering & QC.
ST-2086 metadata is stored per composition, so in a project with multiple compositions, you can have different metadata settings for the mastering display.
If the Mastering Display information is already present in the media, then ICE will automatically display it.
However this parameter can be manually modified, using the list of presets including the most common HDR monitors.
-
Use Custom to define your own monitor characterization.
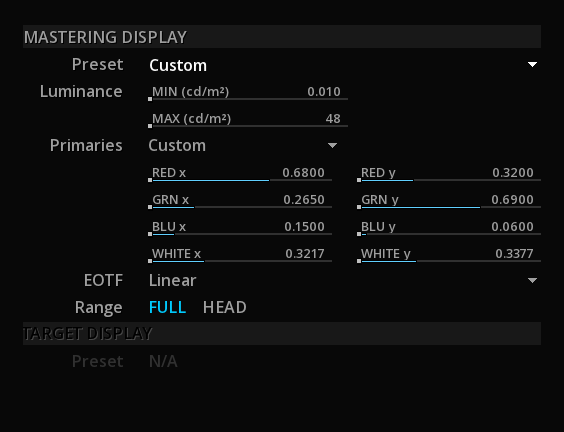
The list of presets varies according to the CMS workflow chosen.
|
If the monitor list is empty, it might be a problem of Windows ‘access rights on the folder. In order to fix it, go to the ICE folder, right-click on the displays folder and go to Properties then Security to give the Full control. |
|
If your monitor is not in the preset list, you can create one by using an existing sample in XML and edit it. This XML has to be place in : \program files\Marquise Technologies\ICE\resources\displays |

8.4. Working in ACES
When working is ACES mode, it is necessary to characterize the source according to its IDT (Input Device Transform), and for what output you would like to see it, the ODT (Output Device Transform).
ICE Prime offers a non exhaustive list of IDTs, including the ones defined for cameras, as well as a list of main inverse ODTs.
8.4.1. ACES workflows
Different workflows are avaialble when working in ACES, and it must be chosen first in order to have access to the right paramters.
8.4.2. Input Device Transform
When selecting the ACES CMS, ICE Prime inspects the media metadata to automatically set the right IDT if that metadata is present.
However it is always possible to modify manually the IDT:
→ In the SOURCE MEDIA section of the CMS page, choose the IDT corresponding to the properties of your source.
8.4.3. Output Device Transform
In ACES system, you need to choose an Output Device Transform to display your content accordingly.
However, the ODT are also depending of the workflow you have chosen.
|
ODTs are defined for standard outputs only not specific pieces of equipment. |
The ODTs are chosen in the Displays / Target Display drop down menu.
9. HDR WORKFLOWS
ICE Prime allows to work in content in HDR according to a large variety of standards, including:
-
HDR10
-
HLG
-
Dolby Vision
9.1. Setting your HDR workflow
To start setting the desired HDR mode, you need to define the correct workflow in the .
According to the CMS System chosen, Native or MTCMS, more operations will be available.
When a HDR content is opened in ICE Prime, and recognized as is based on the file’s metadata, an HDR logo (HDR10, HLG or Dolby Vision) will be displayed on the top left of the Viewport:
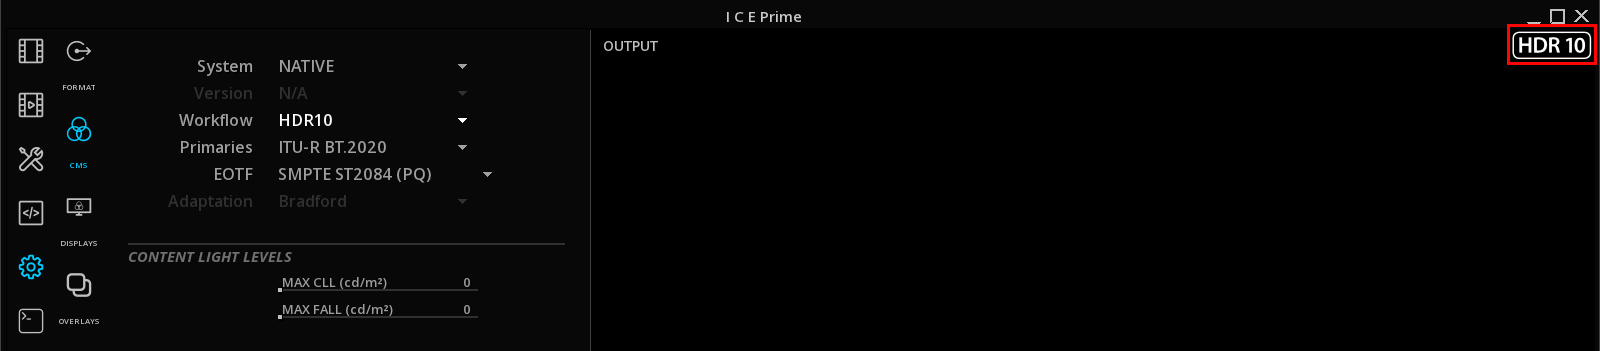
This logo will also be updated according to the CMS Workflow chosen.
For more information about the CMS, refers to Color Management.
9.2. Working in HDR
ICE Prime permits the playback and inspection of HDR10 and HLG content with a variety of tools.
9.2.1. Content light levels
When the metadata of the Max FALL and Max CLL are present in the media, ICE Prime displays them in the CMS page.
However, these metadata can be wrong or missing. In that case, you can edit them:
→ Double click on the Max FALL or Max CLL value to modify it and validate with ENTER.
9.2.2. Subtitles Color Management
ICE Prime allows to manage the subtitle’s luminance independently from the one of the video track.
This is managed in the CMS page under Timed Text Color Space:
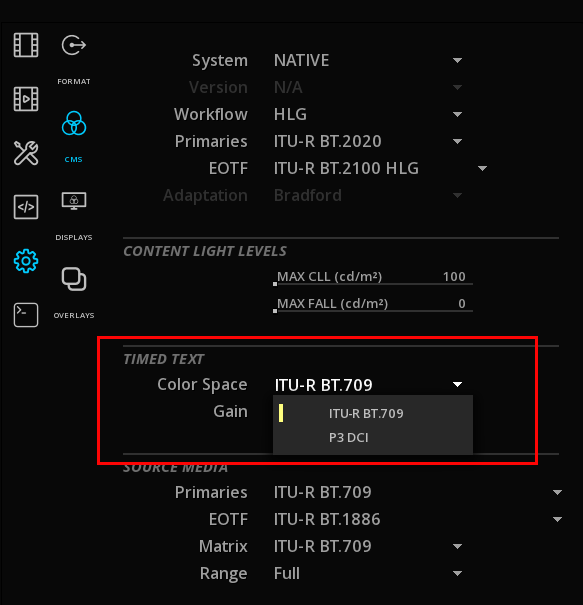
By default, a factor of 4 is applied as gain (e.g. a 100 nits subtitle will appear at 400 nits.), but it can be modified using the Timed Text Gain’s slider.
9.3. Working with Dolby Vision
Dolby VisionTM is a proprietary HDR technology developed by Dolby Laboratories, Inc using the PQ curve on the operating principle of Parametric Tone Mapping.
See section Third-party Licenses of this manual regarding all obligations related to the use of DolbyTM technologies.
ICE Prime allows you to playback Dolby Vision content using the HDMI Tunneling capability.
This features refers to the capability to send the Dolby Vision metadata through HDMI, directly to a Dolby Vision consumer TV device that will perform the rendering of the tone mapping.
Dolby Vision content means any kind of files containing embedded Dolby Vision metadata as well as stand alone Dolby Vision metadata files.
9.3.1. Enabling HDMI Tunneling
The output of Dolby Vision metadata through HDMI is done using the AJA Kona5 video IO card.
→ To allow the sending of the Dolby Vision metadata directly to the consummer TV, the HDMI and the Dolby Vision options must be enabled in the Video Output Settings.
|
The rendering capabilities of the Dolby Vision content is limited by the consummer TV device. For example, not all displays supporting Dolby Vision will read the latest versions of the metadata. |
9.3.2. Setting the CMS for Dolby Vision
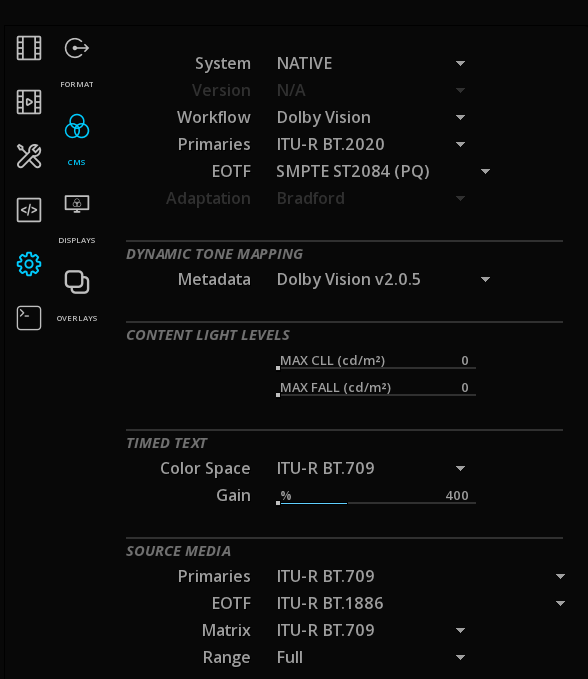
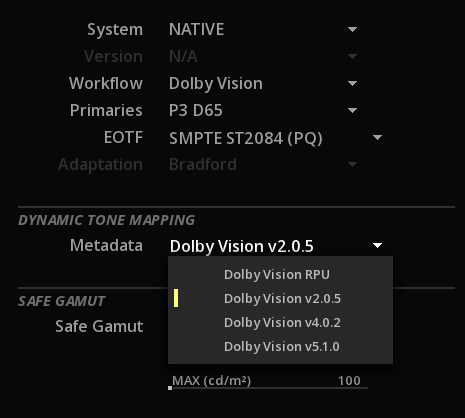
→ Whatever the CMS chosen, select Dolby Vision in the Workflow drop-down menu.
→ Select the Primaries. It can be either BT.2020 or P3D65.
→ Select the metadata version in the section Dynamic Tone Mapping:
|
Remember that when using MTCMS, it is always necessary to characterize the source color space |
→ Setup the Mastering Display for Dolby Vision in the
For more information, please refer to the chapter Mastering Display.
|
Set the Mastering Display after having set the CMS properly in order to display the right list of monitors characterization. |
|
If you are importing external Dolby Vision metadata, make sure that the Mastering Display information of the composition match those used in your existing Dolby Vision MDF file (i.e. if Dolby Pulsar is used into the Dolby Vision MDF file, select the Dolby Pulsar from the template list). |
9.3.3. Import of media with embedded Dolby Vision metadata
You can import media with embedded Dolby Vision metadata like any other file.
ICE Prime will detect the metadata and automatically set the CMS settings accordingly.
In addition, the video track displays a white line representing the embedded metadata:

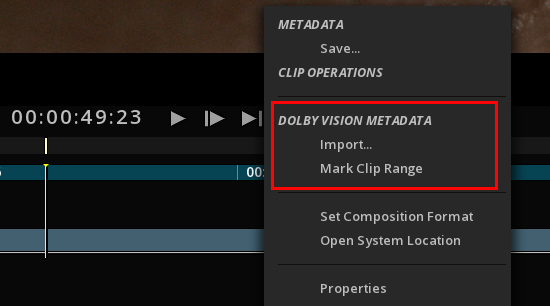
Displaying the Dolby Vision metadata sections
ICE Prime allows to "cut" the video track into sections corresponding to the metadata in order to facilitate the navigation and the QC of the file.
→ Right-click on the video track on the timeline to display the Clip Operations Menu and select Dolby Vision Metadata / Cut:
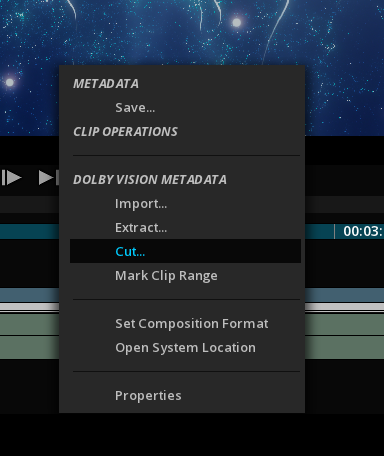
ICE Prime will analyse the metadata and display the metadata sections as cuts on the video track, easier to navigate from cut to cut or using the Events viewer:
9.3.4. Import of stand alone Dolby Vision metadata
Marquise Technologies' solutions support the two variations of Dolby Vision metadata:
-
Dolby Vision color volume transform metadata into an XML file, aka "Dolby Vision metadata XML file" or "Dolby Vision MDF file".
-
Dolby Vision color volume transform metadata into an ISDX track (MXF file), following the RDD 47 "Interoperable Master Format – Isochronous Stream of XML Data (ISDX) Plugin" specification.
also known as "Dolby Vision metadata MXF file" or "Dolby Vision metadata MXF track"
Import Dolby Vision metadata XML file
There is two methods for importing XML file:
-
Import directly on the clip
-
Import as an auxiliary track
Import on the clip
After the source content is added on the timeline and the composition settings properly set, you can add the corresponding Dolby Vision metadata XML.
→ Right-click on the desired clip on the timeline and choose Dolby Vision Metadata Import:
→ Choose the file using the browser and validate with OK.
A successful import will result in displaying a yellow bar on the concerned clip, cut into segments representing the changes in the Dolby Vision’s metadata:

|
The Import Dolby Vision Metadata on clip option is enabled only if the Composition Settings are set on Dolby Vision workflow and the Dynamic Tone Mapping Metadata is Dolby Vision V2.0.5 or higher. |
|
This method works only when the metadata file exactly matches the duration of the clip. |
Import as an Auxiliary track
→ Drag & drop the XML file in the media bin.
If the XML file is correct, the Dolby Vision logo is displayed in the thumbnail of the file.
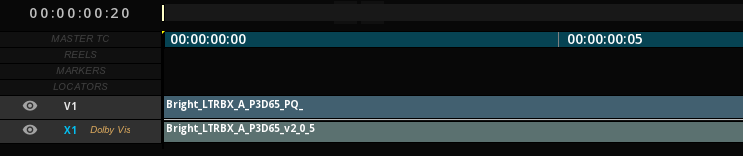
→ To load the XML on the timeline, right-clip on the file in the media bin and choose "Add Media Track"
This will add a new auxiliary track (X1) on the timeline:
Import Dolby Vision metadata MXF track (RDD 57 ISXD)
The RDD 57 ISXD is an MXF file containing the Dolby Vision metadata. This MXF is behaving as any other MXF essence, and is manipulated as a track.
Proceed with the exact same method as described above for importing XML metadata as an Auxiliary track.
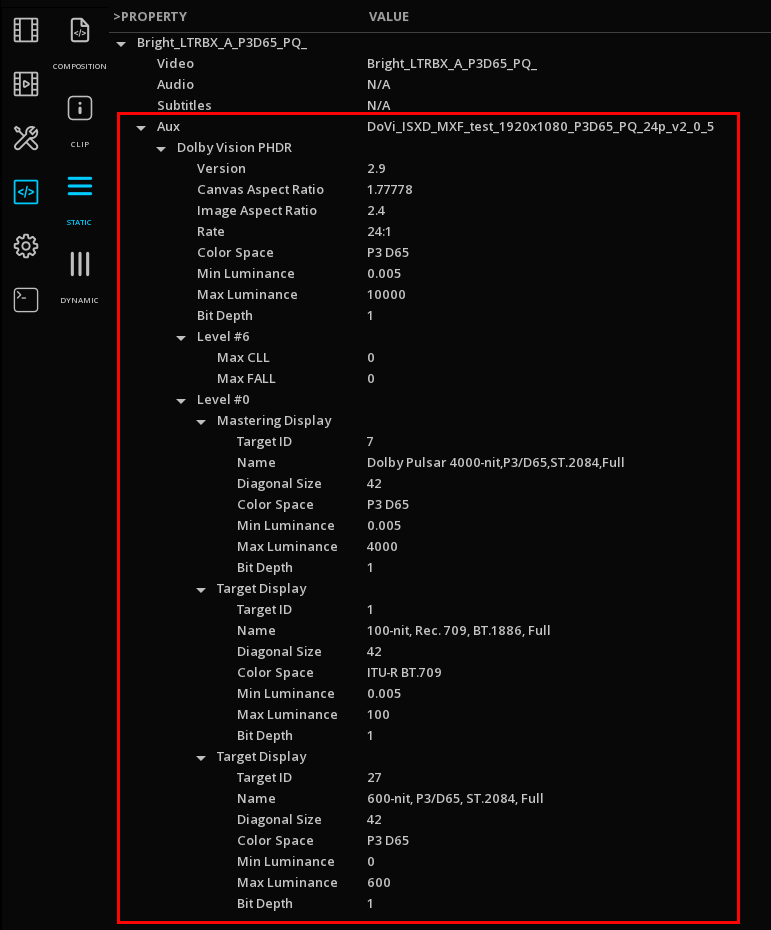
9.3.5. Inspecting Dolby Vision metadata
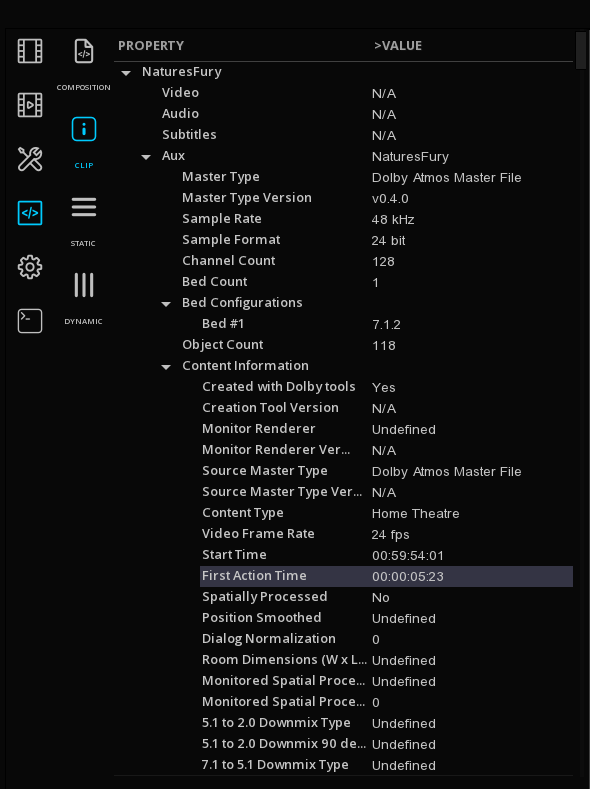
There is different ways to inspect Dolby Vision metadata.
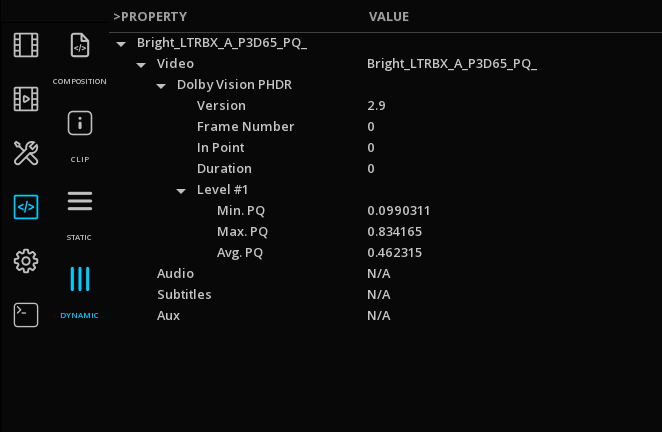
In the the Dolby Vision’s metadata are displayed over two sections:
| STATIC METADATA |
Displays information related to the entire content (Targets, Mastering Display, Color Space, etc.) |
| DYNAMIC METADATA |
Displays dynamic metadata, according to the location of the Playhead. |
10. AUDIO MONITORING
In ICE Prime, the audio is outputted on both the PC sound card and the video IO card when present.
When the PC sound card is used, if the system resources are low, some images may drop to follow the sound.
|
If several audio devices are connected to the system, they can be selected in the |
When using the video IO, audio and images are guaranteed to be in sync.
Different tools like audio routing, down-mix and Audio meters are available for the QC of audio tracks.
10.1. Display Audio Waveforms
→ Press Right mouse button on the TimeLine background to display the Composition drop-down menu and select Audio Waveforms:

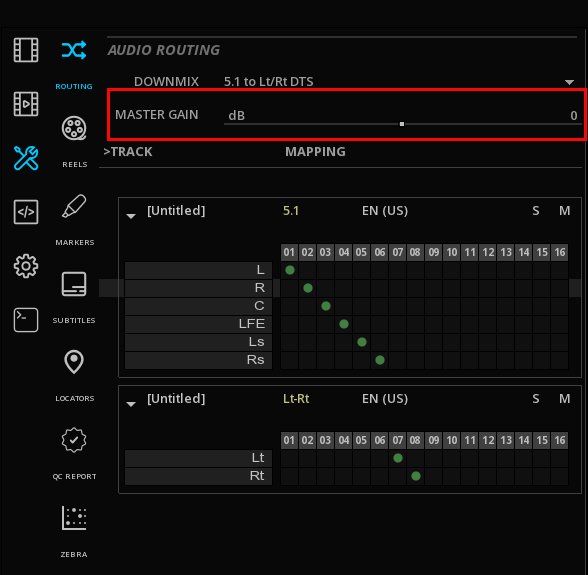
10.2. Audio Routing
To route the audio channels:
→ In the Command Panel, select TOOLS then ROUTING
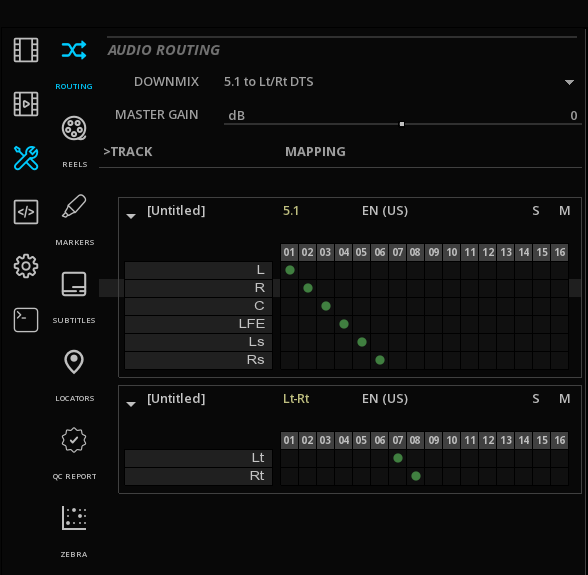
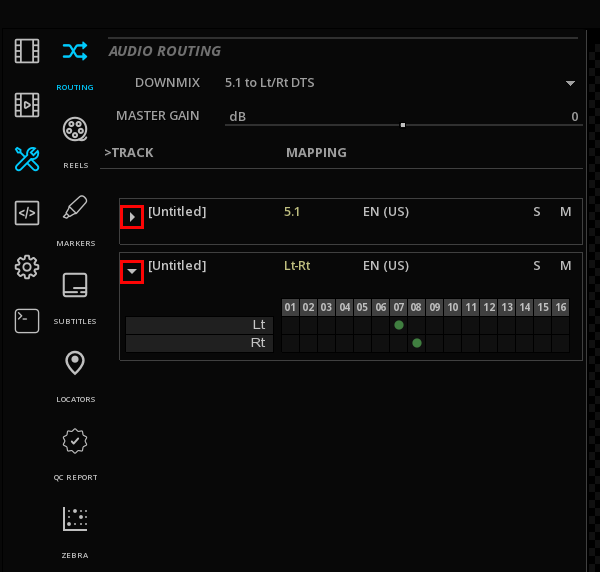
If several soundfileds are present on te timeline, they will be displayed in the Routing panel in the same order.
→ To expand / collapse a soundfield, click on the triangle:
→ To change the channel assignment, click on the desired channel for each audio layers.
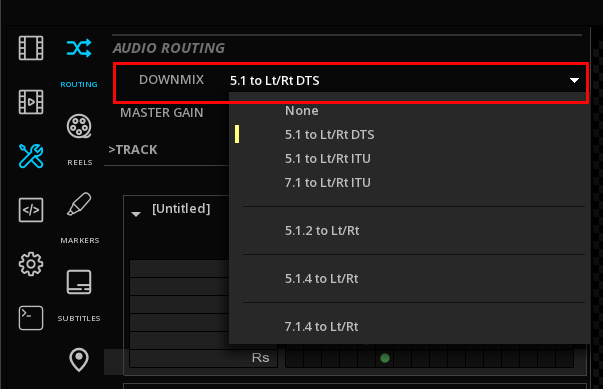
10.2.1. Down-Mix
If your listening device is not compatible with the soundfields on the timeline, it is possible to perform a down-mix to stereo:
→ In the Command Panel, select TOOLS then ROUTING
→ In the Audio Routing section, use the DOWNMIX dropdown menu to select the desired downmix configuration:
10.2.3. Audio Analysis
ICE Prime offers a full set of Audio monitoring tools for the quality control. Refers to the chapter Audio Scopes for details about the different audio scopes.
10.3. Immersive Audio
10.3.1. Importing Immersive Audio files
In ICE Prime, the Immersive Audio files are not managed as regular audio tracks.
When dropping an immersive audio track into the Media bin, ICE Prime recognizes the metadata and displays a specific icon for the file:

→ To load the immersive audio file on an existing Timeline, use the "Add as Media Track" function from the Media bin.
|
A double click on the file in the media bin will immediatly open the file in the timeline at the right frame rate and time code configuration, in a new composition. |
10.3.2. Dolby Atmos
ICE Prime supports Dolby AtmosTM technology and allows the import and the render of Atmos files for QC purposes.
Supported Formats
ICE Prime supports the following Atmos formats:
-
DAMF (Dolby Atmos Master Format)
-
BWF ADM (Broadcast Wave Format with Audio Definition Model)
-
IAB (Immersive Audio Bitstream) for DCP (including encrypted files) and IMF
These files can be imported in the timeline as stand-alone files or wrapped in an IMF or a DCP package (IAB).
|
When importing a DAMF in stand-alone, select in the directory the file with the extensions .atmos and drop it into ICE Prime: 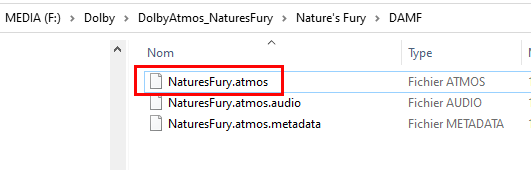
|
Importing Dolby Atmos files
Proceed as mentioned above in the section Importing Immersive Audio files.
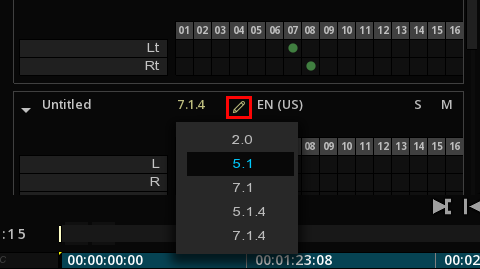
Dolby Atmos Rendering
It is possible to render (playback) all supported Atmos files through the integrated Dolby Atmos Renderer, to the exception of encrypted IAB files for Digital Cinema Package.
The Dolby Atmos Renderer permits the following channel based audio outputs:
-
2.0
-
5.1
-
7.1
-
5.1.4
-
7.1.4
The rendering is defined by the default audio configuration, but this can changed on the fly in the Command Panel, TOOLS, ROUTING, Audio Routing.
→ Click on the audio configuration Edit icon to display the drop-down menu and change the configuration:
Dolby Atmos Room visualizer
The Room visualizer allows a real-time 3D visualization of the immersive audio objects positions in the room.
See Audio Scopes to display the Room meter.
11. SUBTITLES & CAPTIONS
ICE Prime is able to import and manage a wide range of subtitles and captions for the broadcast and film industries. To see the full list of formats supported by ICE Prime, please refer to the Appendix Supported Input formats.
ICE Prime benefits from an advanced subtitle rendering engine, permitting to inspect the timed text in its exact format and style (what you see is what you get).
In the following section, we will see how to import and inspect subtitles and captions.
11.1. About Subtitle Management
The way subtitles are managed by the application depends on the format but there is some common behavior.
11.1.2. Subtitle File Duration
It is important to differentiate the effective duration of the subtitle file from the interpreted duration.
The effective duration is ranging from the first spot to the last spot. Whatever timecode is indicated for the first spot, once placed on the timeline the interpreted start will always be 0:00:00:00 by convention unless otherwise specified in the metadata.
If a start TC is embedded in the file, for example an EBU STL file starting at 10:00:00, then the way it will be interpreted by the timeline differs depending on the way the file is opened:
If you double click on a subtitle file specifying a start TC directly in the media bin, it will be placed automatically on the timeline at the indicated Start TC:

If you import a subtitle file specifying a start TC on an existing timeline using drag & CTRL V, then the start TC will be the one of the playhead location:

In this last case, the original TC of the spots will be relative to the new start point of the file. This will be reflected in the spot list with a different color for the time codes (see below Subtitle Inspection chapter).
11.1.3. Subtitles metadata
Some subtitle formats carry metadata that are displayed in the page.
When you import the file on a new subtitle track on the timeline, the track box will display the language information present in the file. However, if you delete the file and replace it with another clip of another language, the Track language information will not be updated automatically.
11.2. Import subtitles and captions files
It is possible to import text subtitles and graphic subtitles. A type of track is dedicated to subtitles files on the top of all the video layers in the composition.
11.2.1. Import text profile
The import of standalone subtitle file is similar to a video or a audio assets.
You can import the subtitle file directly from the OS browser by selecting it and dragging it into the Command Panel's Media bin.
11.2.2. Import image profile
The way to import subtitles and captions image profile is identical to text profile.
However, make sure the image files and the subtitle XML file are in the same root folder, permitting to automatically locate the image files to which the XML subtitle file refers.
11.2.3. Place a subtitle file in an existing composition
→ To place your subtitles and captions in an existing timeline, move the Playhead to the desired location for placing the start of the subtitle then in the media bin, right-click on the subtitle file and chose "Add as Media Track".
You can load multiple subtitle tracks, they will be stacked on the top of each other.
To view them use the enable / diabled icon on the Track control Box.
11.2.4. Set the composition format according to the subtitle
It is possible to configure the composition size according to the properties of a subtitle file such as IMSC1. To do this, the file must have the attribute tts: extent defining the resolution of the image in its settings.
Most of the time, this attribute is used in the subtitle files using the image profile and the pixel unit. This is to inform the optimal resolution of the use of the subtitle, so as not to deteriorate its quality which the would make it unusable:
-
From the subtitle track, right-click on the subtitle file.
-
Click on Set composition format.
The composition fits the dimensions of the subtitle file.
In the case of using a subtitle in text profile, the subtitle will use the same resolution as the current composition. The text being vectorial, there is no loss of quality.
11.3. Inspecting subtitles
Once a subtitle has been loaded on the timeline, it is ready for inspection.
The subtitle file can contain one or more blocks of text, each block itself being able to contain several lines of text. Each block has several properties, including the font face type, size and of course the start and end time during the presentation.
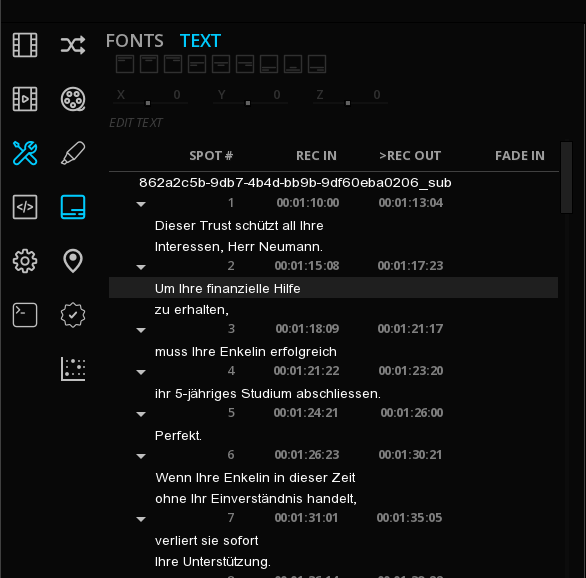
11.3.1. Browse subtitles using the spotlist
It is possible to quickly navigate from one subtitle line to another one in the composition.
→ Go to
→ Double click on a timecode REC IN or REC OUT :
|
If the Timecodes in the spotlist are displayed in yellow, it means that they have been adjusted from the original source timecode to match the actual composition. |
11.3.2. Inspecting Subtitle Placement
On the Viewport you can activate different Guides in order to verify the placement of a subtitle on the image:
→ Display the Safe Frame guides using Alt+F.
Parameters for the Safe frame guide can be adjusted in
→ Display a grid on the Viewport using Alt+G.
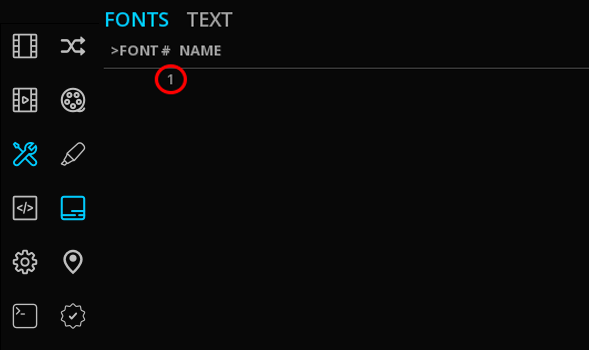
11.3.3. Loading manually a font
As soon as the subtitle has been placed in the timeline, subtitles are displayed into the Viewport. If not, verify that the associated font has been loaded:
→ Go to
If a font is present in the subtitle, it’s name will automatically appear under the tab FONT in white color.
|
A subtitle file can have multiple fonts referenced into the list. |
If the font has been not properly loaded, no font will be listed or the font will be displayed in red.
In addition, the Console will display an error message:

→ Double-click on the 1 digit or the font label to open the Font Library.
→ Select the desired font into the list and click on OK to validate your selection. Fonts present in this list are based on the OS font folder.
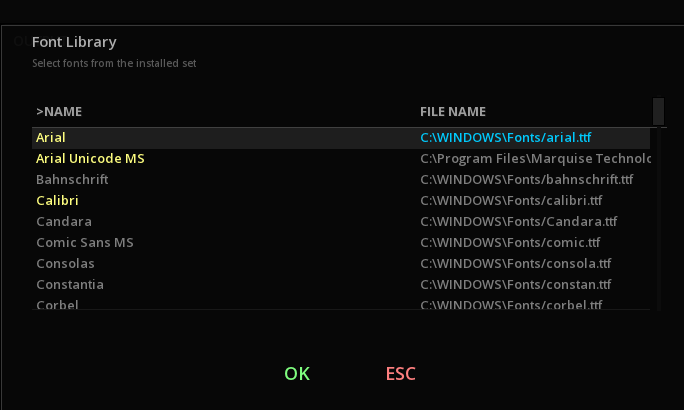
|
TrueType fonts ( |
|
In order for a font associated with a subtitle to be automatically loaded, the font file must be in the same root folder as the subtitle text file. Otherwise, the Arial font is loaded by default. |
12. INSPECTION TOOLS
ICE Prime has a full set of inspections tools & Scopes, for the image, the audio and also the content bit rate.
12.1. About the scopes
A variety of scopes are available for image and audio analysis.
You can access the scopes and meters using the Viewport menu: On the viewport, right-click to display the menu and select the desired scopes:

→ Alternatively, you can use the keyboard shortcuts for each scope.
Each scope can be shown or hidden independently.
They can be moved and resized across the entire application window at the operator’s convenience.
→ To adjust the size of the scopes, position the mouse cursor on the corner of the panel and use click & drag up or down.
→ To move the scope, position the mouse on the scope panel and simply click & move.
→ To modify the scope transparency, use the OPACITY scroll bar
→ To display the scope' OPTIONS, right click on the scope. This will open the options' menu. Click anywhere outside the menu to close it.
→ To close a Scope, click CLOSE on the scope.
12.2. Image Analysis
A large set of Analysis tools are avaialble to perform image quality control.
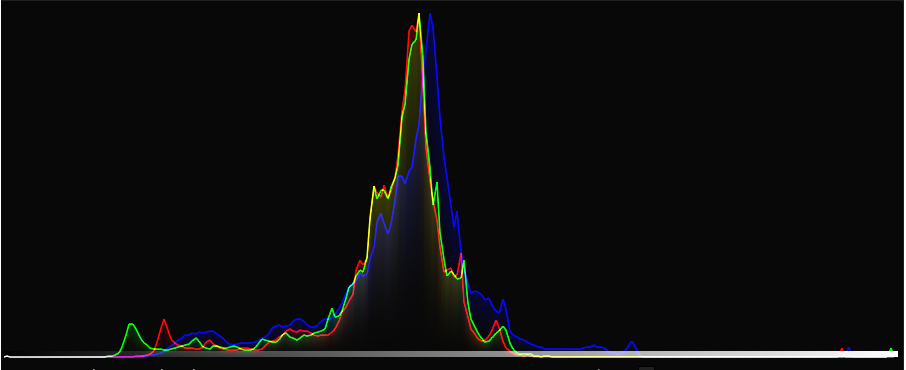
12.2.1. The Histogram
A histogram is a graphical representation of the tonal distribution in a digital image.
It plots the number of pixels for each tonal value. By looking at the histogram for a specific image one is able to judge the entire tonal distribution at a glance.
→ You can use Shift+H to display the Histogram.
Options
| Style |
The Histogram can be set to display RGB information separately or overlaid (red, green and blue together). |
| Sample |
Show the position in the Histogram of the pixel at the cursor’s location |
| Density |
For film: |
| SMPTE |
Show Video Range (aka Head/Legal). |
| RGB |
Show minimum and maximum values per color channel. |
12.2.2. The Vectorscope
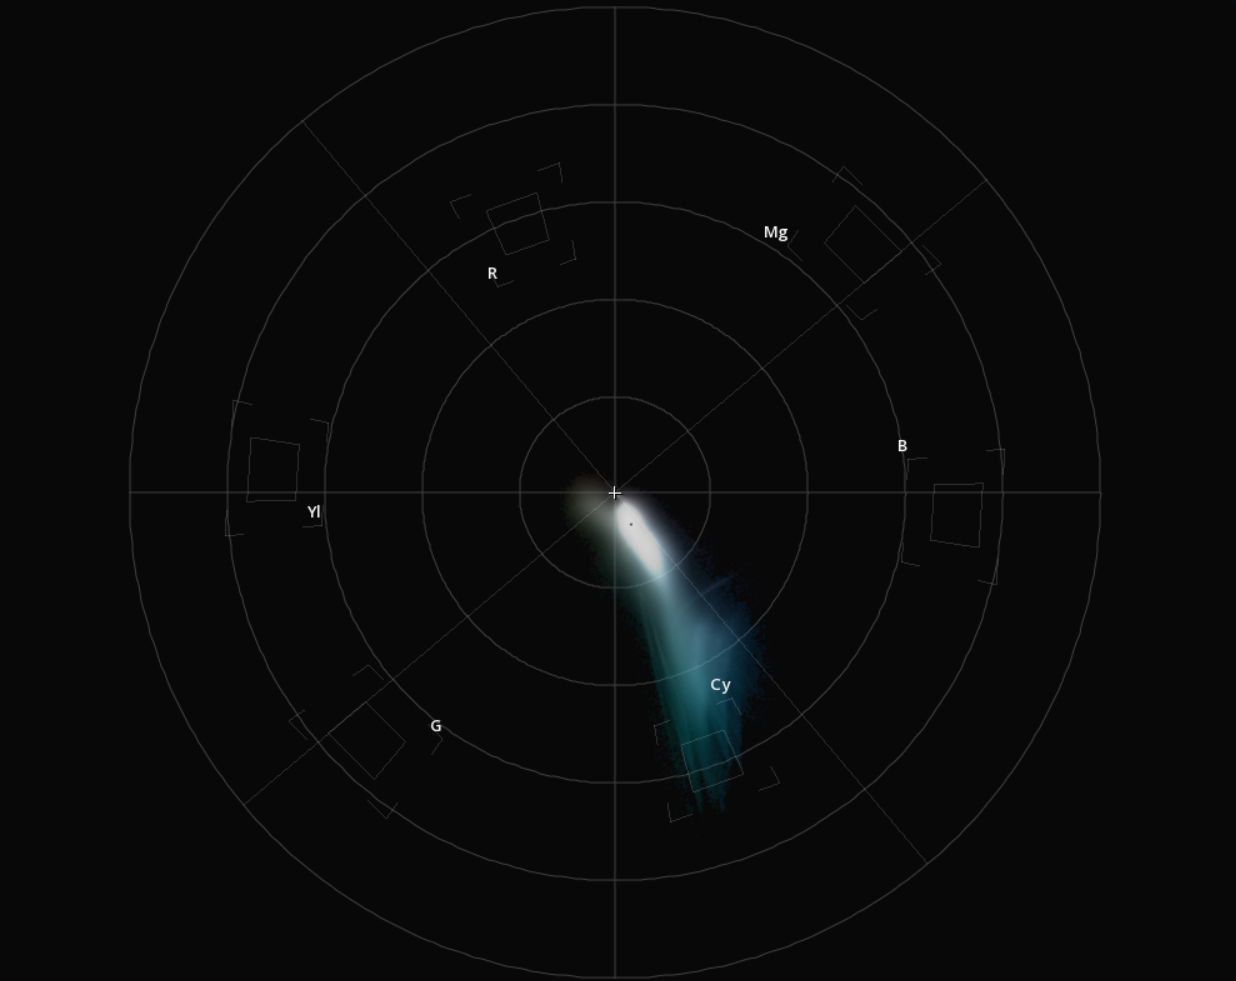
The vectorscope is used to visualize chrominance, which is encoded into the video signal as a subcarrier of specific frequency: it plots the Cb and Cr channels against each other, for the purpose of measuring and testing television signals.
→ You can use Shift+V to display the Vectorscope.
Options
| Labels |
Show/Hide the color labels. |
| Targets |
Showcope-cie.png/Hide the color targets. They represent the maximal values according the Matrix chosen. |
| Sample |
Show the position in the Vectorscope of the pixel at the cursor’s location. |
12.2.3. CIE 1931 Chromaticity Diagram
This diagram allows you to see how the signal is displayed within the color space chosen.
→ You can use Shift+G to display the CIE diagram.
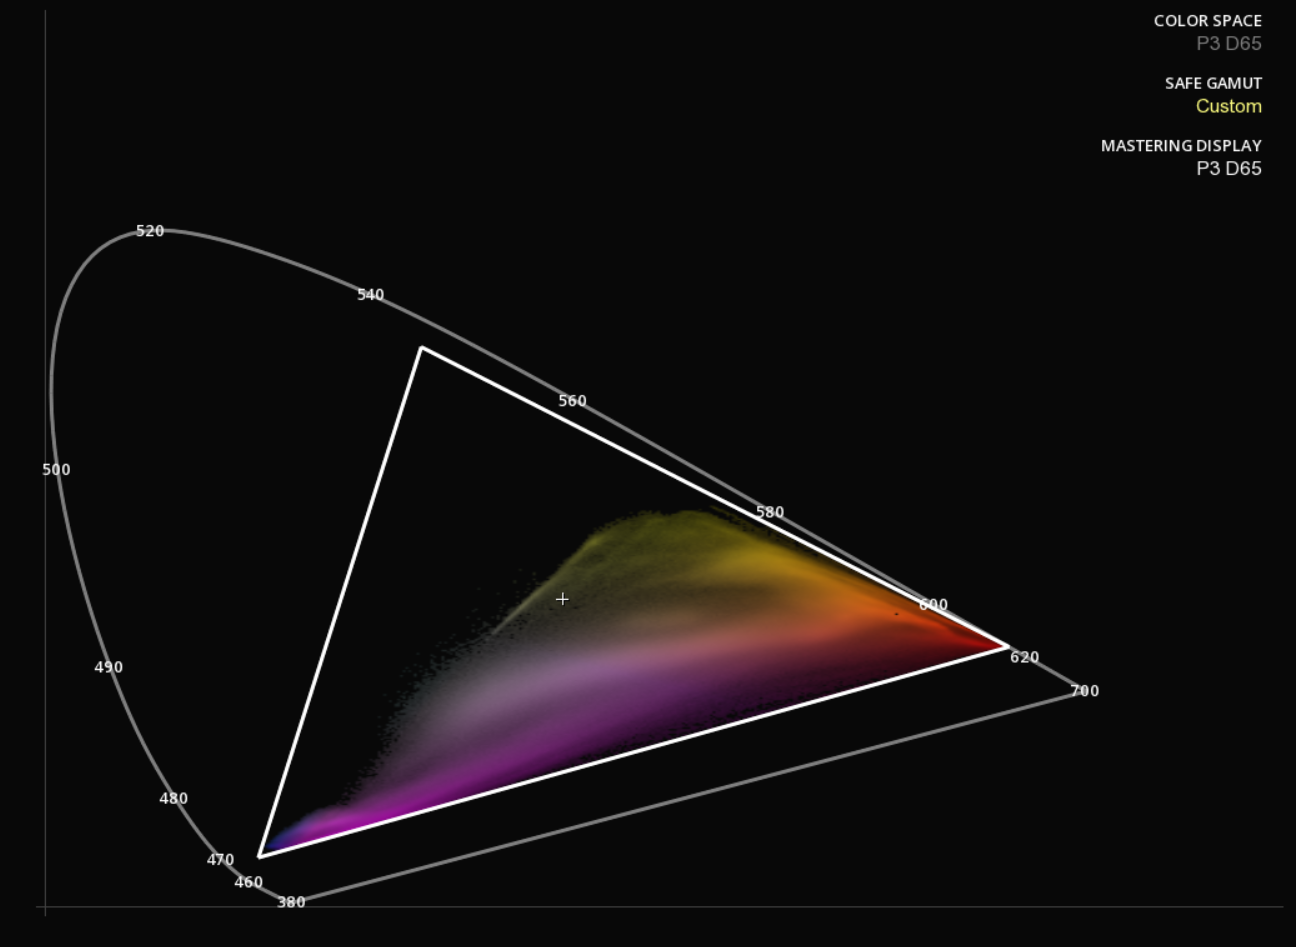
Legend
| Color Space |
Displays the working color space for your content (see Settings | CMS). |
| Safe Gamut |
Display the safe area for a particular color space . (see Settings | CMS) |
| Mastering Display |
Display the capabilities of the Mastering Display . Refer to the Mastering Display section for more information. |
Options
| Sample |
Show the position in the diagram of the pixel at the cursor’s location. |
| Labels |
Show/Hide wavelenghts in nanometers |
| Display |
Show/Hide Mastering Display Information |
| Safe Gamut |
Show/Hide Safe Gamut information |
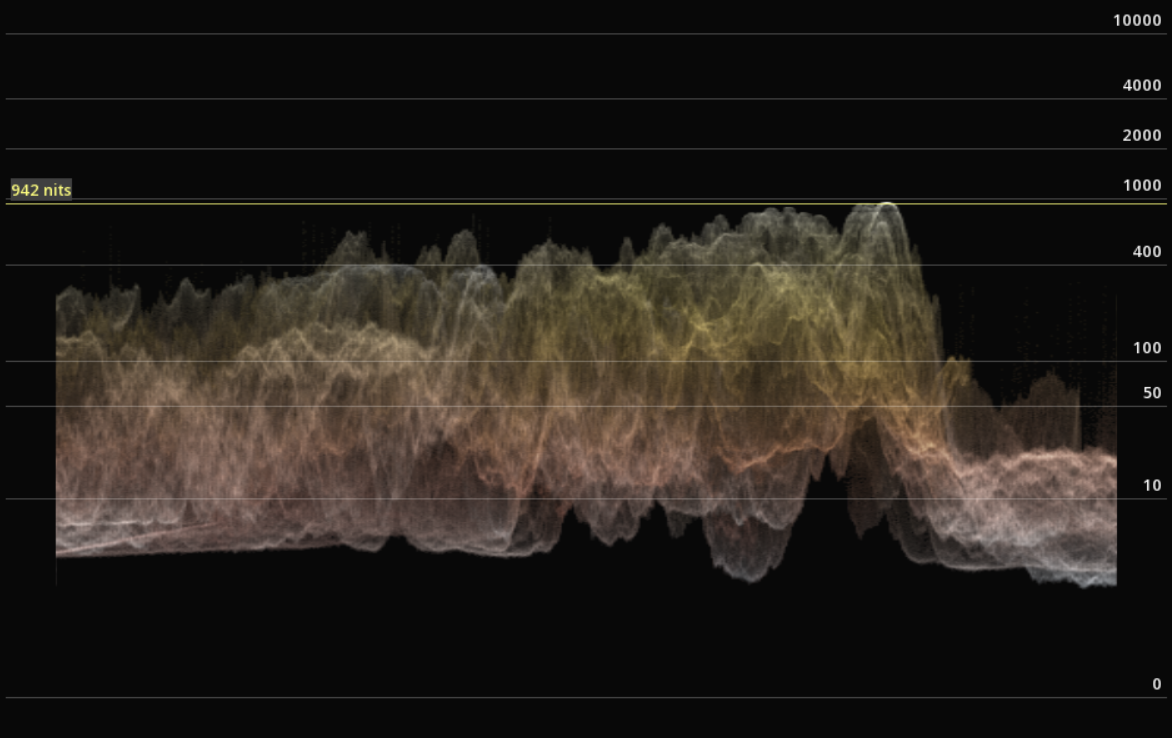
12.2.4. The Waveform
The Waveform is used to measure and display the level of the brightness, or luminance, of the part of the image being drawn onto a screen at the same point in time.
→ You can use Shift+W to display the Waveform.
Options
| Type |
You can switch between the traditional video waveform and the ST2084 or HLG modes used for monitoring HDR content. |
| Style |
the Waveform can be set to display information in a large variety of styles. |
| Color Space |
You can choose between the RGB or YCbCr color spaces. |
| Sample |
Move the mouse on the image to show the level at the cursor’s position (yellow line). This value is displayed in percentage in video mode, or in Nits (Candela/sqm) in ST2084 and HLG modes. |
|
When using the type ST2084 the waveform will display the scale in relation to the settings selected for the Mastering Display. |
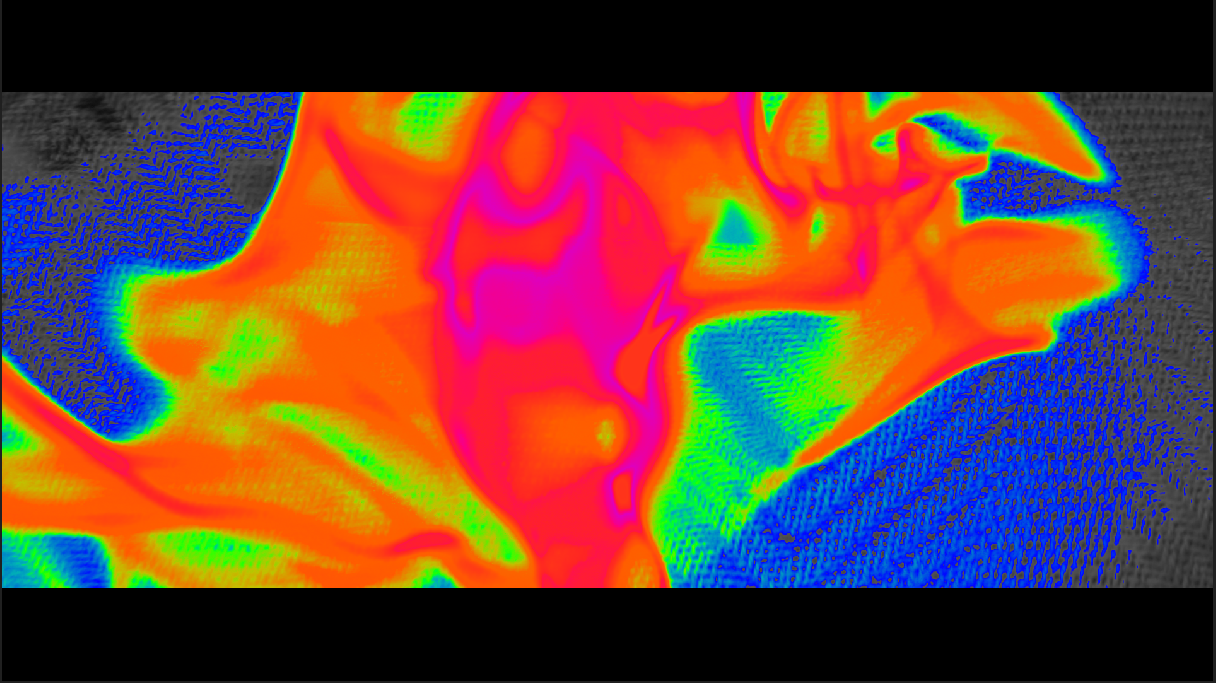
12.2.5. Zebra patterning
This tool offers different modes in order to inspect the image.
→ to activate the Zebra, use Alt+Z or press Z on the user interface. By default, the Zebra patterning is set on Signal Range mode.
→ to toggle between the different Zebra modes, select them in the Command Panel / Tools / Zebra:

Signal Range
This mode displays in blue the pixels below the boundaries, and in red those above:

|
The Signal range boundaries are defined by the Mastering Display parameters in the Composition Settings. You can also set your own maximal and minimal Luminance values by choosing a Custom Mastering display. |

12.2.6. The Luminance Meter
The Luminance meter is used to measure the photometric brightness of an HDR image. It measures the amount of light that strikes a surface in the picture.
→ You can use Shift+N to display the Luminance meter.
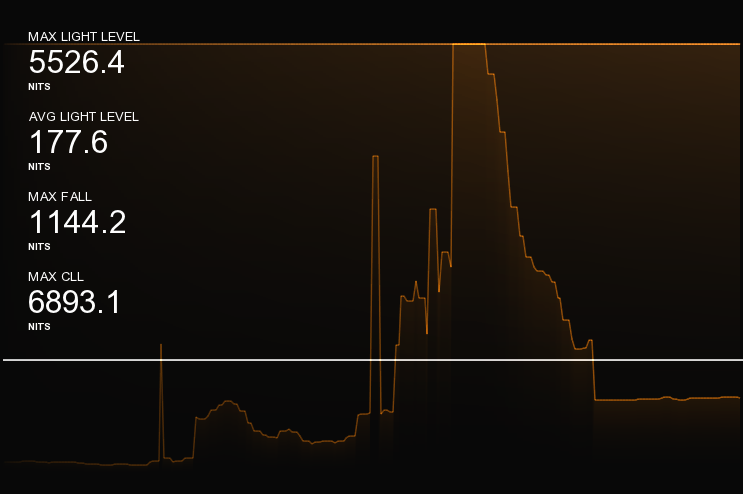
| Max Light Level |
Informs you about the higher light level on the current frame. |
| AVG Light Level |
Informs you about the average light level on the current frame. |
| MaxFALL |
Indicates the highest frame average brightness per frame (entire content). |
| MaxCLL |
Indicates the brightest pixel (entire stream). |
| Sample |
Move the mouse on the image to show the level at the cursor’s position (white line). |
| Live view |
Analyses on the fly the MaxFALL and MaxCLL values of the content while it is playing. You can have different nit scales by selecting the desired one with the drop-down menu. |
| Global view |
Allows you to display the full graph statistics values after the launch of a global analysis. For more details refer to the section HDR. |
12.2.7. Pixel Inspector
You can display detailed color information for a specific area of the image (pixel accuracy).
-
To display or hide the Pixel Inspector, use Shift+K.
|
To display the color values, enlarge enlarge the size of the inspector window. |
The information are displayed per color channel (R, G, B and A).
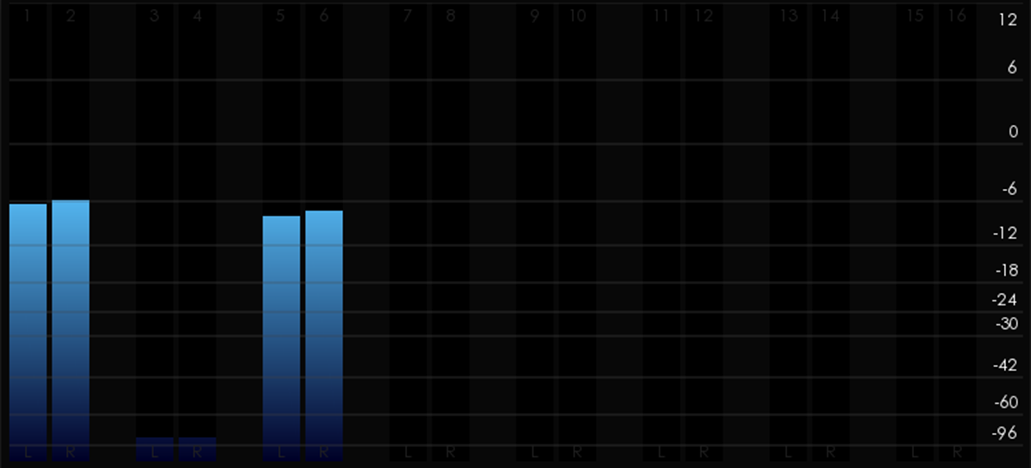
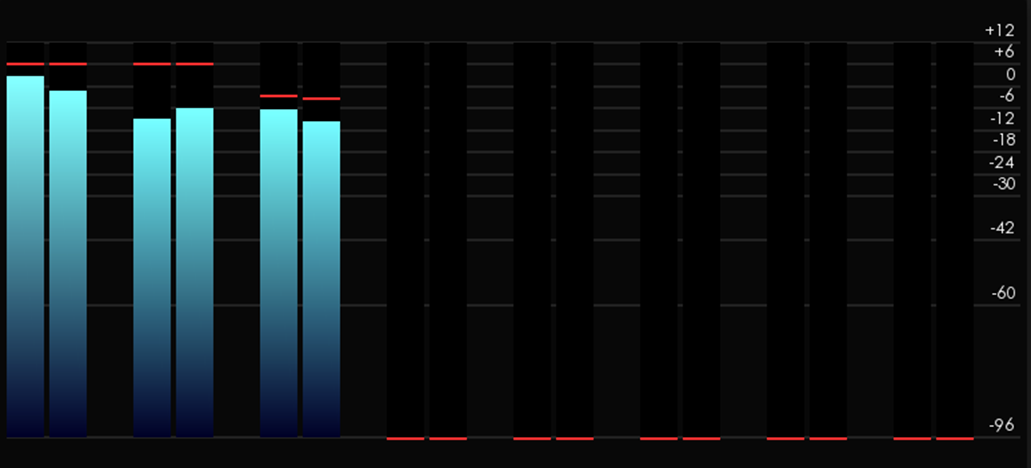
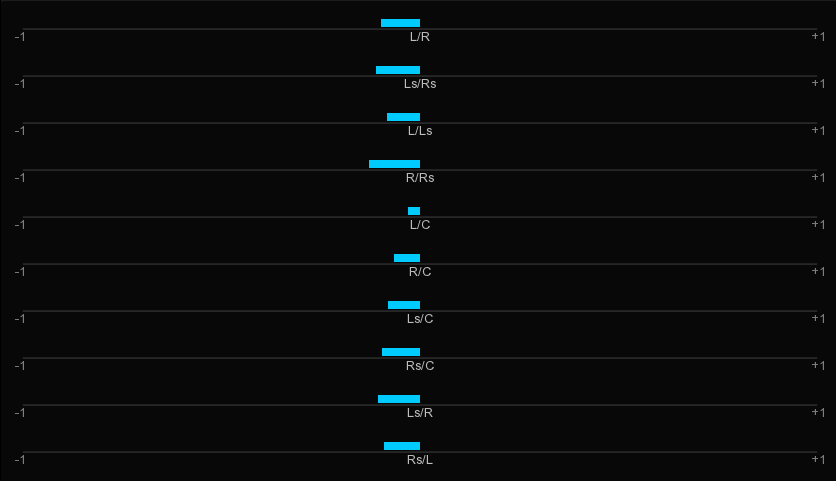
12.3. Audio Scopes
There is a full set of Audio monitoring tools for the quality control.
→ You can use Shift+A to display the Audio meter.
Select a Type of meter and the desired scale for the meter:
→ Right-Click on OPTION to toggle the meters.
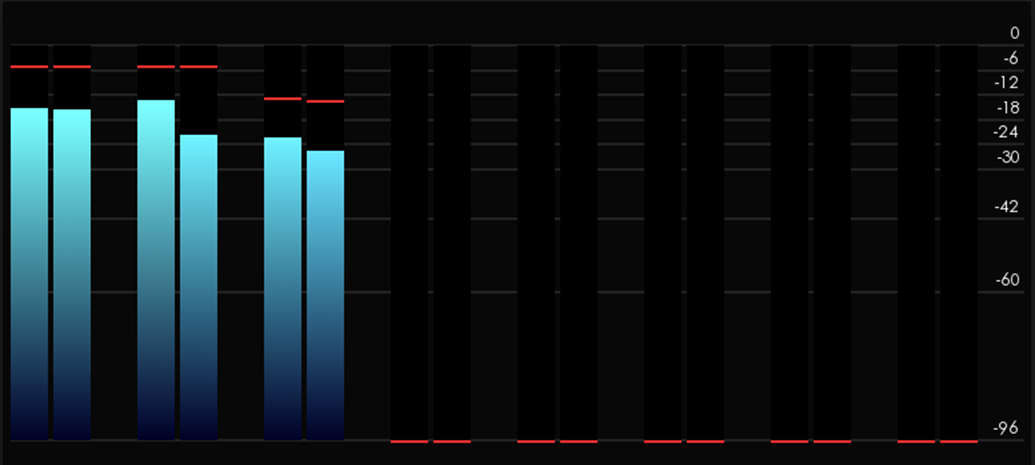
12.3.3. Loudness Meter
The Loudness meter measures the human perceived loudness of an audio content.
Here the Loudness Meter is based on the EBU R128 Loudness recommendation.
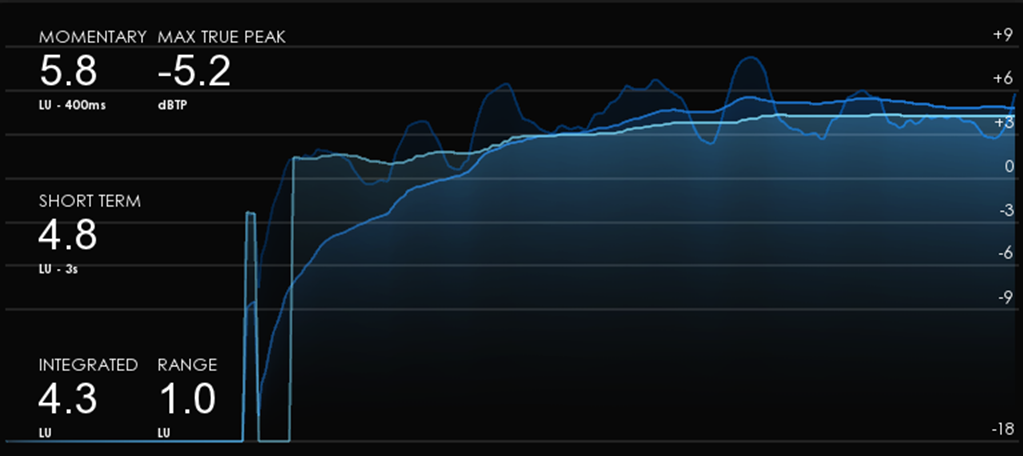
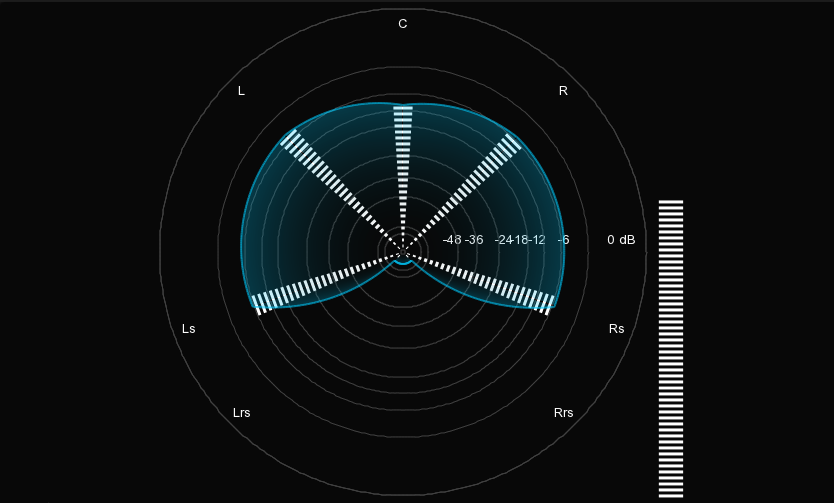
12.3.4. Surround Meter
In this meter, the positions of the full range loudspeakers are marked on a graticule and the amplitude distribution of the sound-field is used to modulate a visual representation, also called "jellyfish display".
12.4. Bitrate Meter
The Bitrate Meter is used to measure the bitrate of the content playing.
→ You can use Shift+B to display the Bitrate meter.
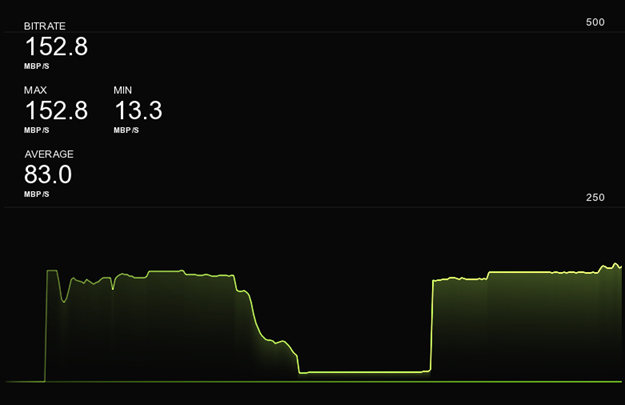
| Bitrate |
Indicates the current bitrate in MBP/s when playing. |
| Max / Min |
Indicates the maximum and minimum bitrate in MPB/s recorded by the meter. |
| Average |
Shows the average analysed bitrate. |
|
the Bitrate meter is active only when you launch the playback. If you stop the playback, the counter will be reset. |
→ You can select the desired scale of reference to read the measures in the drop-down menu.
13. FILE BASED QC SUPPORT
ICE Prime integrates with automated file based QC solutions for providing an easier review of the error reports.
Currently we provide support for the following automated QC reports:
-
Aurora (Tektronix)
-
Baton (Interra)
-
Pulsar (Venera)
-
Vidchecker (Telestream)
When loading the XML reports from these automated QC solutions, the operator is able to manually inspect the errors flagged for a media by navigating on the timeline from error to error.
13.1. Loading a QC report
You can import a QC report using drag & drop:
→ Drag & drop the report in XML in the application window.
→ To navigate from error to error, open the Control Panel / Tools / QC Report:
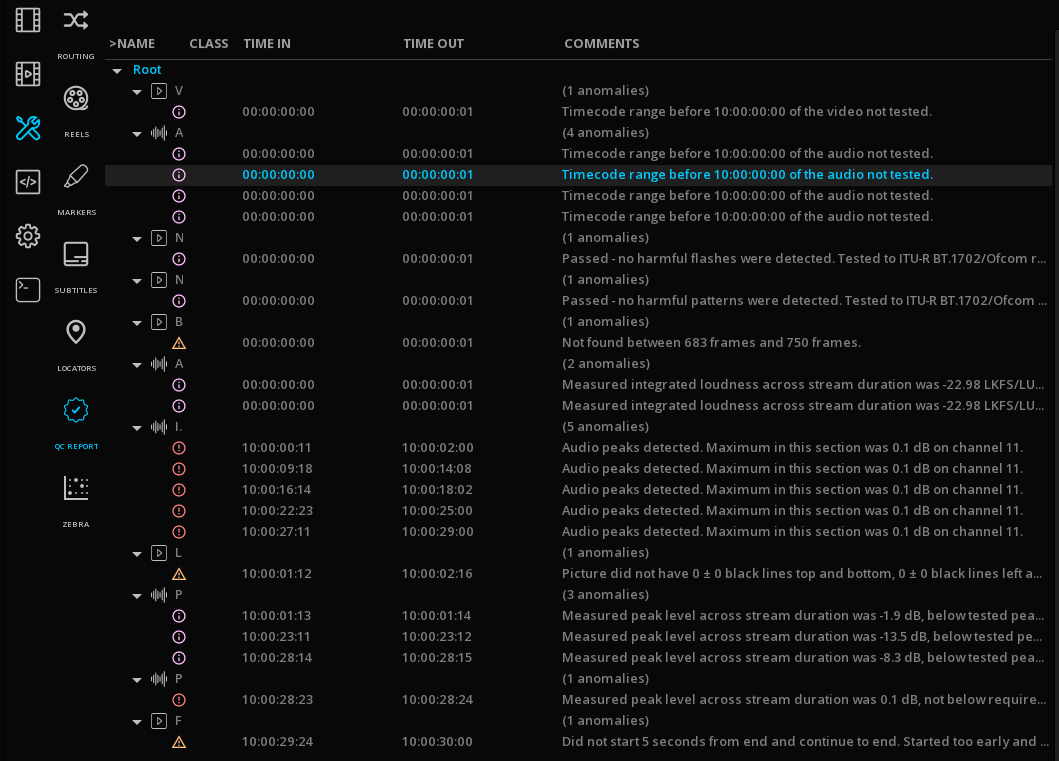
→ Click on a specific Timecode to jump to the location of the error.
→ To display the full error name you can resize horizontally the Command Panel.
APPENDICES
1. Console
The Console tab in the Control Panel displays information about the image processing pipeline performances.
Different gauges display the buffer usages of the key devices while performing the playback of a media.
| Storage |
Usage of the media storage for the content currently on the timeline |
| GPU |
Usage of the GPU buffers |
| Video |
Usage of the buffers for transfers between GPU and Video IO card |
| Device |
Usage of the buffers transferred by the Video IO card |
| Drop |
display information in the case of drop frames |
2. Where to find certificates for ICE Prime
2.1. Public Certificate containing its Public Key and Digital Signature
Name |
ICE.cert.sha256.crt |
Location |
C:\ProgramData\Marquise Technologies\ICE Prime\certificates |
Purpose |
This file contains ICE Prime’s public key and digital signature. It must to be sent to any DCI mastering station that needs to create a secure DCP for use by ICE. |
2.2. Public Certificate Chain
Name |
ICE.chain.sha256.pem |
Location |
C:\ProgramData\Marquise Technologies\ICE Prime\certificates |
Purpose |
This file contains the entire certificate chain of digital signatures of the ICE Prime. It is required if the certificate needs to be verified. It may be distributed freely in accompaniment with the Public Leaf Certificate. .pem = Privacy-enhanced Electronic Mail. |
3. Input File Formats Support
3.1. Compositions
| Format Name | File Extension(s) |
|---|---|
Advanced Authoring Format |
.aaf |
D-Cinema Composition Playlist |
.xml |
EDL CMX 3600 |
.edl |
Final Cut Pro |
.xml |
Final Cut Pro X |
.fcpxml |
IMF Composition Playlist |
.edl |
3.2. Camera Files
| Camera | Models | Format Names |
|---|---|---|
Apple |
iPhone |
h.264 QT MOV |
ARRI |
Alexa (B6W, LF, SXR, SXT, XR, XT, 65) |
ARRIRAW (incl. 4:3), ARRIRAW MXF |
BlackMagic |
Cinema, Pocket Cinema, URSA |
Blackmagic RAW |
Canon |
EOS 1D / 5D / 7D |
h.264 QT MOV |
GoPro |
Any |
h.264 MP4 |
Nikon |
DSLR cameras |
NEF DSLR RAW |
Panasonic |
Varicam 35 |
Panasonic VRW RAW |
Phantom |
4K Flex |
.cine RAW |
RED |
Dragon |
REDCODE RAW (R3D) |
SONY |
F65, F55, F5 |
SonyRAW |
3.3. Image Sequences
| Format Name | File Extension(s) | Comment |
|---|---|---|
Cineon |
.cin |
|
DPX |
.dpx |
See DPX Support |
Targa |
.tga |
|
TIFF |
.tif, .tiff |
|
ARRI |
.ari |
|
SGI |
.sgi, .rgb |
|
JPEG |
.jpg, .jpeg |
|
JPEG2000 (J2K) |
.j2k, .j2c |
|
JPEG XS |
.jxs |
|
JPEG High Throughput |
.jph |
|
BMP |
.bmp |
|
PNG |
.png |
|
Photoshop PSD |
.psd |
Import composite image only. |
OpenEXR |
.exr |
|
ERIMovie |
.eri |
|
Chyron |
.chr |
|
Media Logic Artisan |
.art |
|
Rendition |
.6rn |
|
DNG |
.dng |
|
Weisscam RAW |
.fhgW* |
|
Canon RAW |
.rmf |
|
Panasonic VRAW |
.vrw |
3.3.1. DPX support
8 bit UYVY |
10 bit YUV 4:2:2 b.e. V2 |
12 bit RGB b.e. |
8 bit YUVA 4:2:2:4 |
10 bit YUV 4:2:2 Cineon b.e. |
12 bit RGB b.e. V2 |
8 bit YUV 4:2:2 b.e. V2 |
10 bit YUV 4:4:4 b.e. V2 |
12 bit RGB l.e. V2 |
8 bit YUV 4:2:2 l.e. V2 |
10 bit RGB Cineon b.e. |
|
8 bit YUV 4:4:4 b.e. V2 |
10 bit RGBA |
16 bit RGB Cineon b.e. |
8 bit RGB b.e. V2 |
||
8 bit RGB l.e. V2 |
DPX Monochrome |
|
8 bit RGBA |
DPX Alpha |
b.e. = big endian / l.e. = little endian
3.4. Video
| Format Name | File Extension(s) |
|---|---|
Advanced Systems Format (Windows Media Video) |
.wmv |
AS-02 |
.mxf |
AS-10 |
.mxf |
AS-11 DPP |
.mxf |
AS-11 D10 |
.mxf |
ARD/ZDF/HDF |
.mxf |
AVI |
.avi |
Avid MXF |
.mxf |
DV |
.dv |
FlashVideo |
.flv |
GXF |
.mxf |
D10 |
.mxf |
RDD9 |
.mxf |
Matroska |
.mkv |
MPEG-2 |
.mpg, .mpeg |
MPEG-4 |
.mp4 |
MPEG-TS |
.mts |
MPEG-TS BDAV |
.m2ts |
MXF OP-Atom |
.mxf |
MXF OP-1a |
.mxf |
Motion JPEG2000 |
.mj2 |
PhantomCINE |
.cine |
QuickTime |
.mov |
R3D |
.r3d |
WebM |
.webm |
3.5. Audio
| Format Name | File Extension(s) |
|---|---|
Audio Interchange File Format (AIFF) |
.aif, .aiff |
Waveform Audio File Format (WAVE) |
.wav |
Free Lossless Audio Codec (FLAC) |
.flac |
Dolby Atmos |
.atmos |
Digital Theater Systems (DTS-X) |
.dts |
3.7. Subtitles & Captions
| Format Name | File Extension(s) | Comments |
|---|---|---|
Cheetah Closed Captions |
.cap |
|
CineCanvas |
.xml |
|
Digital Cinema XML |
.xml |
|
EBU STL |
.stl |
|
EEG 708 Captions |
.xml |
|
Scenarist Closed Captions |
.scc |
|
Screen Electronics PAC |
.pac |
|
Sony BDN |
.xml, .png, .tif |
|
Spruce STL |
.stl |
|
SubRip |
.srt |
|
SubViewer |
.sub |
|
TTML |
.xml, .ttml |
|
Apple iTunes Timed Text |
.itt |
|
Common File Format Timed Text |
.xml |
|
DFXP |
.xml, .dfxp |
|
EBU-TT-D |
.xml |
|
Internet Media Subtitles and Captions (IMSC) |
.xml, .ttml |
Support for v1. and v1.01. Animation not supported. |
SMPTETT |
.xml |
|
WebVTT |
.vtt |
3.8. IMF Applications
The following IMF packages can be imported:
-
Application 2, 2e (Studio Profile)
-
Application 4 (Cinema Mezzanine)
-
Application 5 (ACES)
-
IMF ProRes RDD45
-
RDD 59-1 IMF Application DPP (ProRes)
-
RDD 59-2 IMF Application DPP (JPEG2000)
Supported JPEG2000 profiles:
-
Broadcast profiles, up to BPC L7
-
IMF profiles, up to 16 bit
4. Third-party Licenses
Marquise Technologies integrates third-party technology into its software solutions. Some of the below listed technology is available in options only.
The end-user is responsible for complying with any and all third-party terms that apply. Access to third-party software is provided for convenience only, and Marquise Technologies has no responsibility for such third-party software.
4.1. ARRIRAW SDK
The ARRIRAW SDK is provided under the 2020 ARRI Partner Program Agreement.
Copyright © ARRI AG.
4.2. Avid DNxHD & DNxHR
Avid formats are provided by the Avid Media Toolkit SDK under Avid DNxHD Unified License Agreement.
Copyright © Avid Technology, Inc.
4.3. Dolby Technologies
Dolby VisionTM is provided under the Dolby Vision Content Solutions System Agreement.
Dolby AtmosTM is provided under the Dolby Atmos Content Solutions System Agreement.
Copyright: Dolby, Dolby Vision, Dolby Atmos and the double-D symbol are registered trademarks of Dolby Laboratories Licensing Corporation.
Confidential unpublished works. Copyright 2021 Dolby Laboratories. All rights reserved.